Event Groups is a feature that allows attendees to register for multiple events using a single registration form. This makes it easier for your attendees to manage their registrations, especially when they want to sign up for multiple events. In this article, we will guide you through:
- The process of setting up Event Groups in your workspace
- Registration flow for attendees
- Pulling reports for the Registrations
Step 1: Log in to app.social27.com and select the workspace that you wish to manage.
To access the Event Groups feature, you must first log in to your Social27 workspace. Once you are logged in, select the workspace that you want to manage.
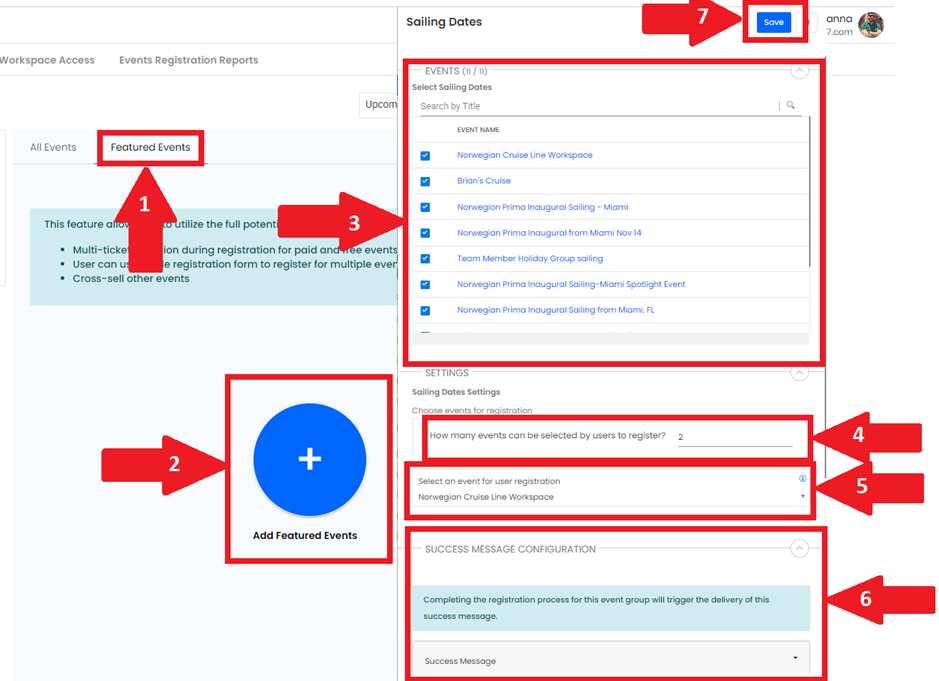
Step 2: Click on the Manage Events tab and select the Featured Events tab.
On the workspace dashboard, click on the Manage Events tab and select the Featured Events tab. This will take you to the Featured Events page, where you can manage the events that will be displayed to attendees.
Step 3: Click the "Add Featured Events" button.
To add events to the Featured Events page, click the "Add Featured Events" button. This will open a list of events that you can select from.
Step 4: Select the events that you would like to show on the Featured Events page.
Choose the events that you would like to display on the Featured Events page. These events will be displayed to attendees, who can then select one or more events to register for.
Step 5: Select the event from which you would like to pull the registration form.
Select the event from which you would like to pull the registration form. This form will be used to register attendees for the events that they select.
Step 6: Scroll down to the Event Group section and enter the number of events that an attendee can register for.
In the Event Group section, enter the number of events that an attendee can register for from the list of events that you selected. This will allow attendees to register for multiple events using a single registration form.
Step 7: Create a success message using our canvas.
Once you have configured the Event Group settings, you can create a success message using our canvas. This message will be displayed to attendees after they have successfully registered for their selected events.
Congratulations! You have successfully set up Event Groups for your workspace. Your attendees can now easily register for multiple events using a single registration form. If you need further assistance or have any questions, please don't hesitate to contact our support team.

Attendee Journey for Event Group Feature: Step-by-Step Guide
Step 1: Select the Event
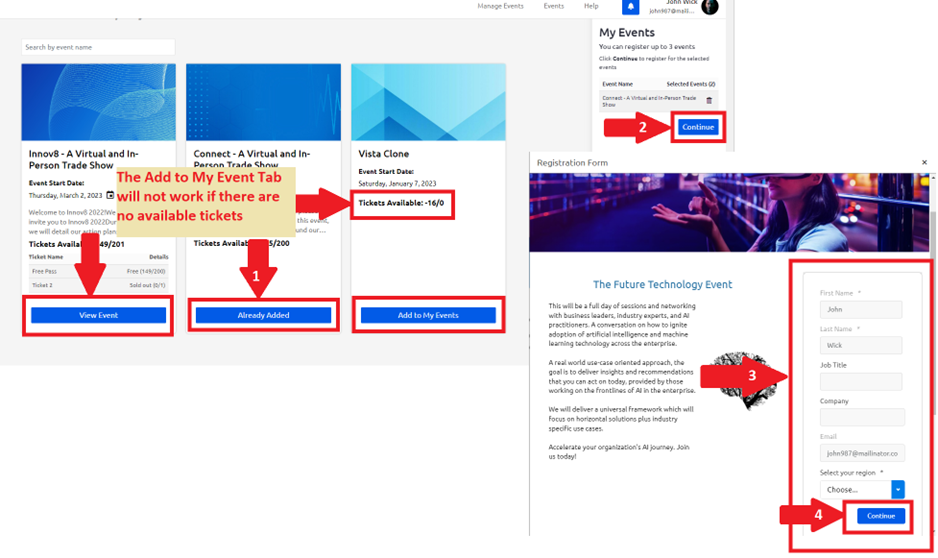
After clicking on the Event/s Workspace link, attendees will be brought to a page where they can select the events they want to attend. However, it's important to note that attendees can only select an event if the capacity has not been met for the event ticket.
Step 2: Add the Event to the Cart
Once attendees have selected the event/s they want to attend, they can add it to their cart. However, keep in mind that attendees can only select the number of events that the organizer has set for the featured events.
Step 3: Continue to the Registration Form
After adding the event/s to the cart, click on the "Continue" button on the right side of the screen. This will bring up the registration form in the middle of the screen.
Step 4: Fill out the Registration Form
Attendees are required to fill out the registration for.
Step 5: Success Message and Email Confirmation
Once the registration form is completed, attendees will be shown a success message indicating that they have successfully registered for the event. They will also receive an email confirmation containing the details of their registration, so it's important to check their inbox for this important information.
In conclusion, by following these simple steps and taking note of the important reminders, attendees can easily register for events that use the Event Group feature and enjoy a seamless and enjoyable event experience.

Pulling reports for the Registrations
The Registration report will include details such as the number of attendees, registration types, and other important metrics that can help you evaluate the success of your event. Follow these simple steps to get the information you need:
- Log in to your account.
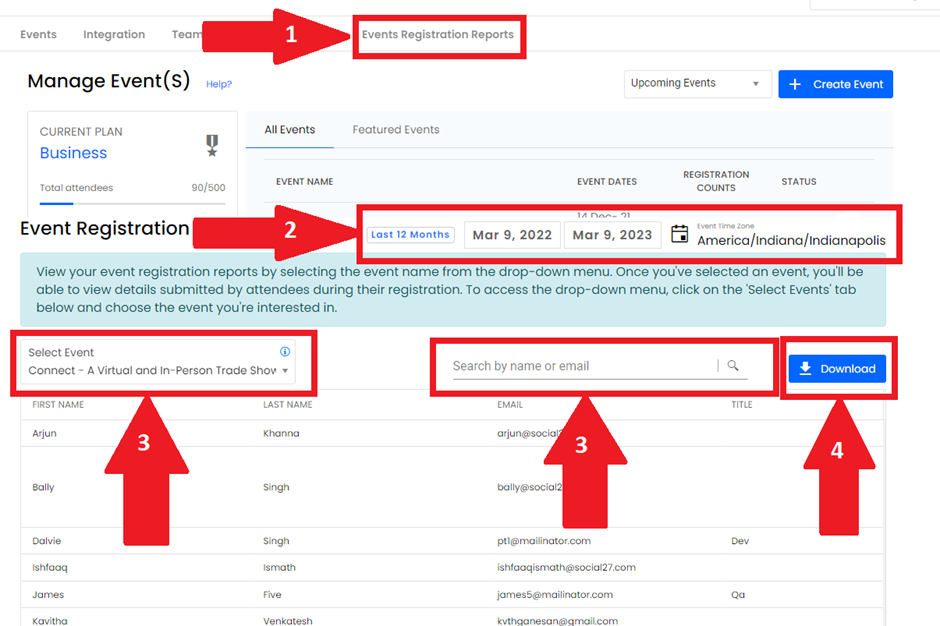
- Once logged in, navigate to the "Manage events" page.
- Click on "Events Registration Reports" from the options available.
- Set the date range you are interested in viewing by selecting the appropriate dates from the top right-hand corner of the screen.
- Choose the event for which you want to see the registration reports by either selecting it from the drop-down menu or searching for it using the search bar.
- Finally, click on the "Download" button to pull the reports.

Comments
0 comments
Please sign in to leave a comment.