Using the Social27 Events Platform, you can quickly and easily set up registration for your events by creating tickets and a registration form. This form asks users to provide their basic contact information and can include additional custom fields if desired.
Walkthrough Video:
Follow the steps below to set up and customize your event's registration flow and form:
- Select a Registration Flow
- Create Event Tickets
- Customize the Registration Page
- Edit the Event Landing Page
- Update Registration Email Notifications
- Consider Registration Tips and Recommendations
1. Select a Registration Flow
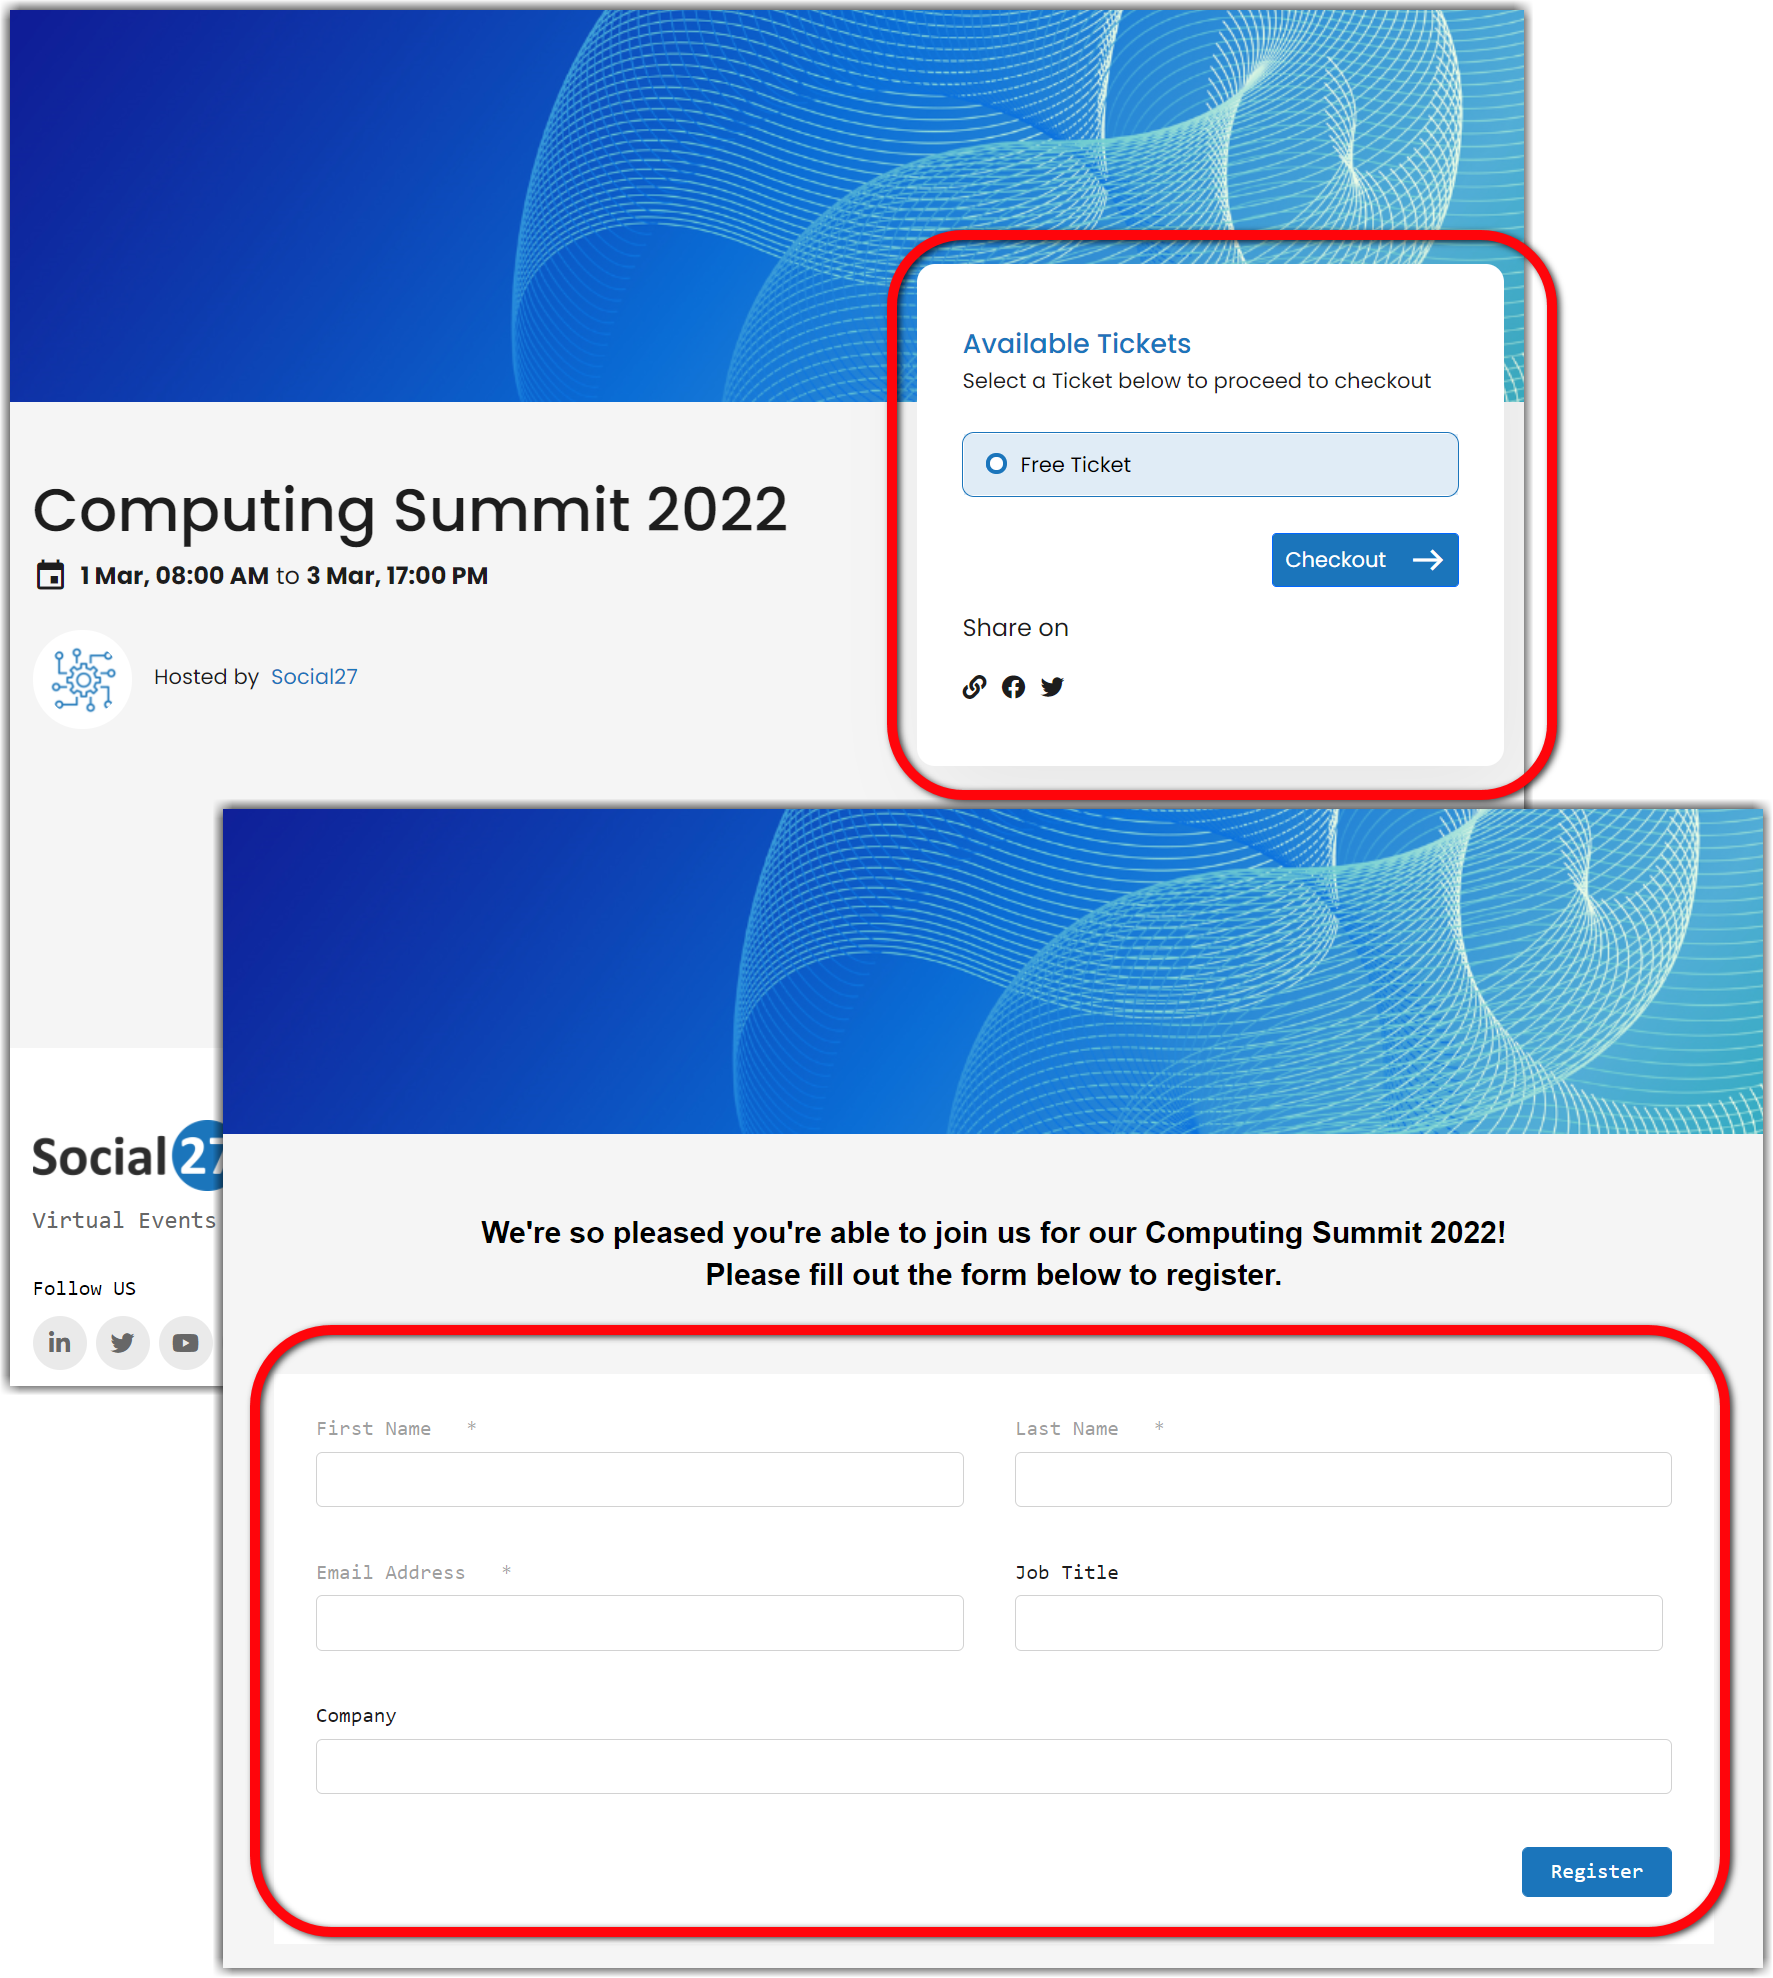
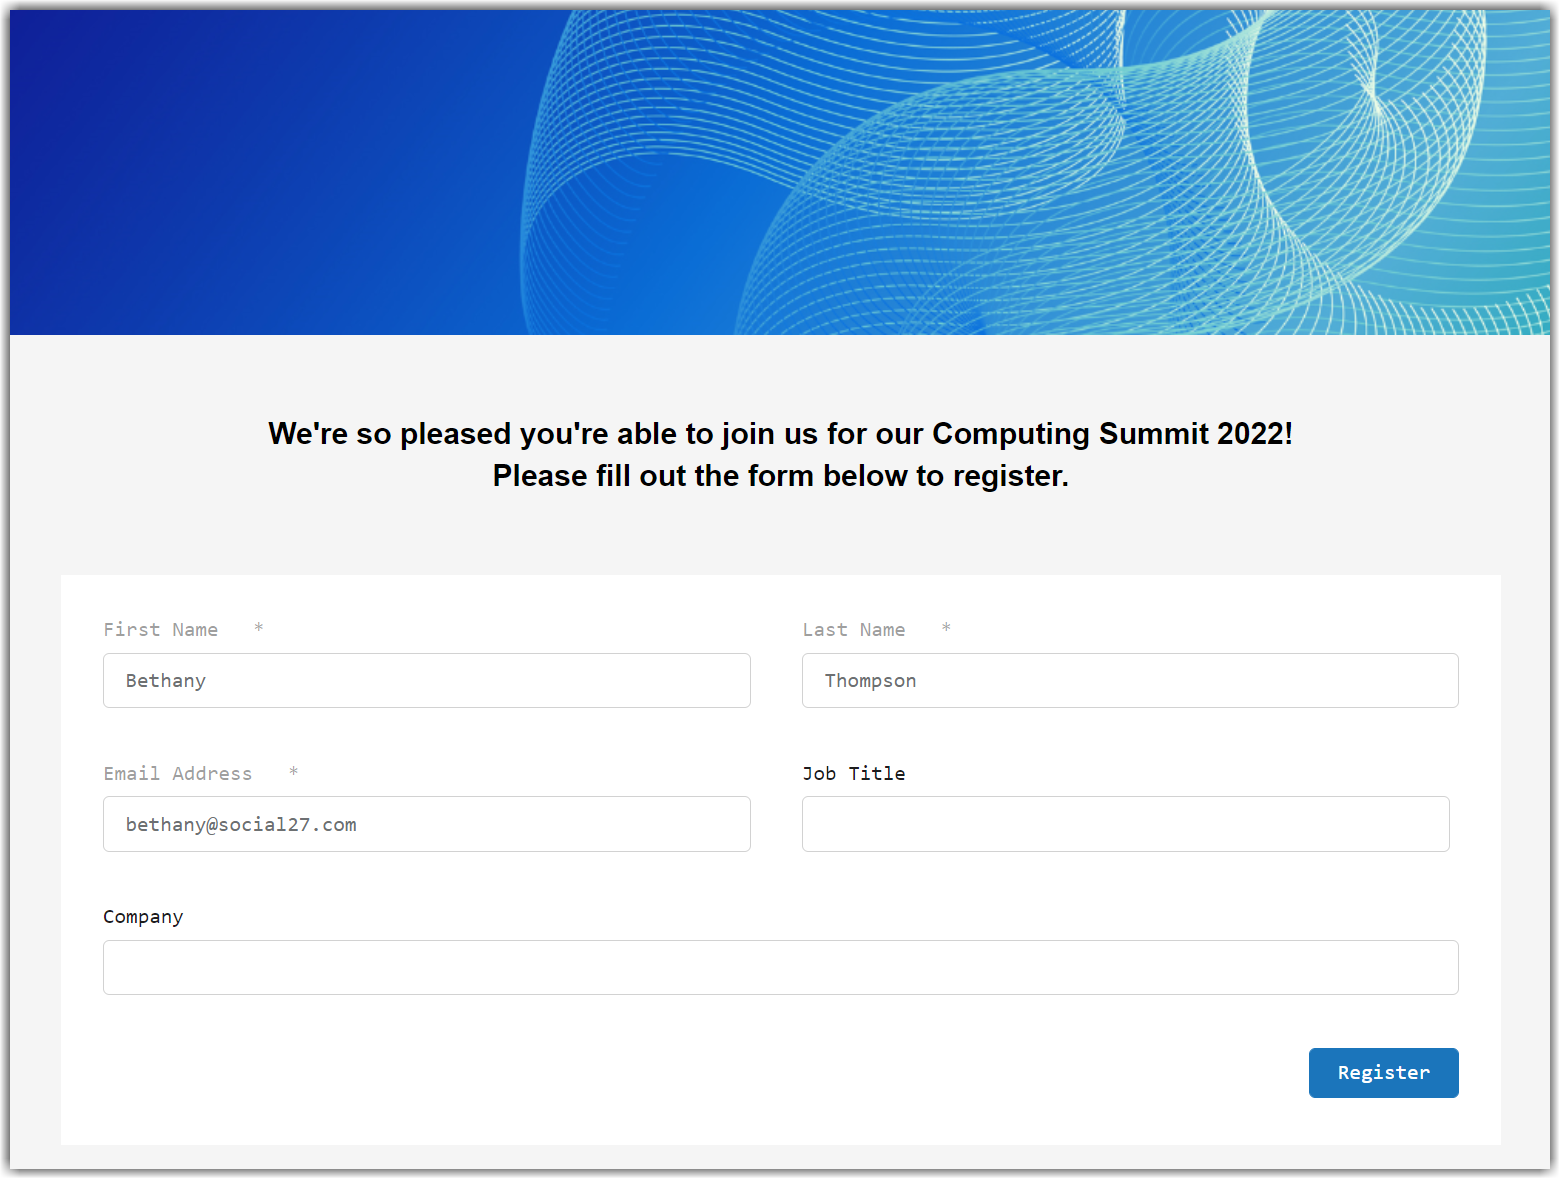
In the Social27 Events Platform, you can choose between two different registration flows Ticket + Registration or Registration Only. When users navigate to your event landing page, they can either see an option to purchase tickets and then register, or immediately see the registration form.
Follow the steps in the rest of this article for your selected registration flow.
|
Ticket + Registration |
Registration Only |
 |
 |
2. Create Event Tickets
Ticket + Registration Flow
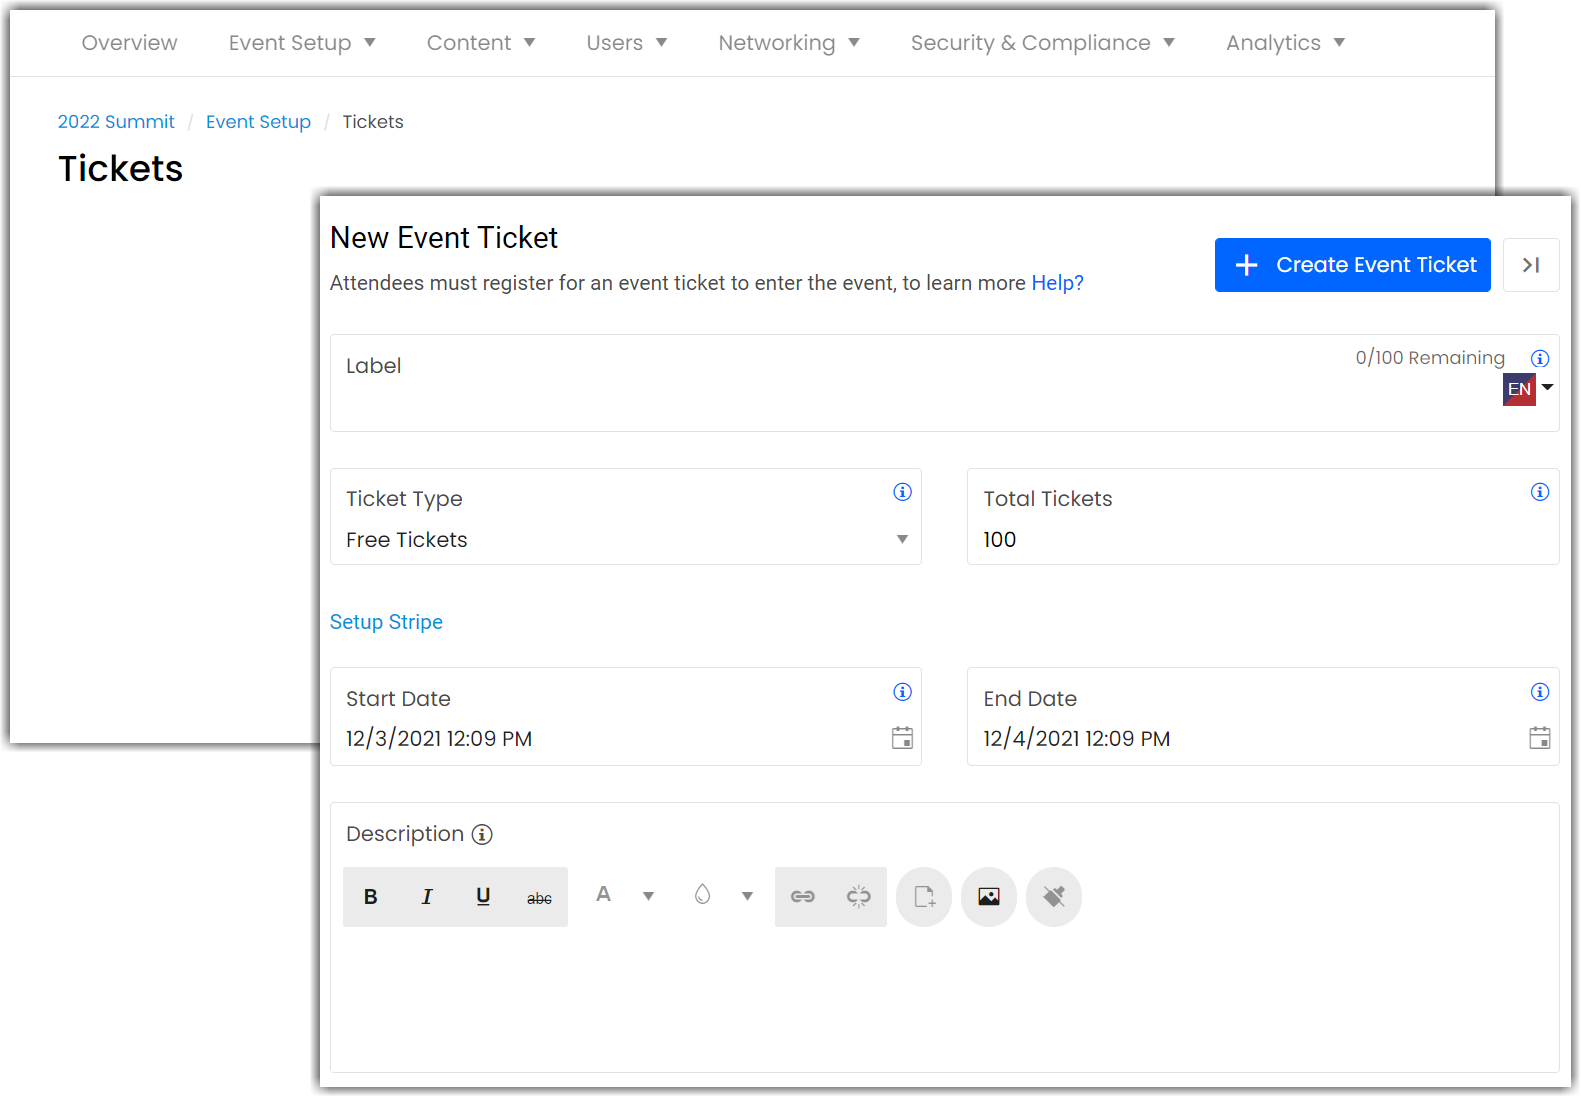
If you want users to purchase tickets before accessing your registration page, navigate to the Tickets page where you can create tickets of varying costs (including free), determine how many tickets are available, and set when each ticket type is available for purchase.
For more information about creating tickets, check out this article.
Registration Only Flow
If you do not want users to be required to purchase tickets, you can skip this ticket creation step.
3. Customize the Registration Page
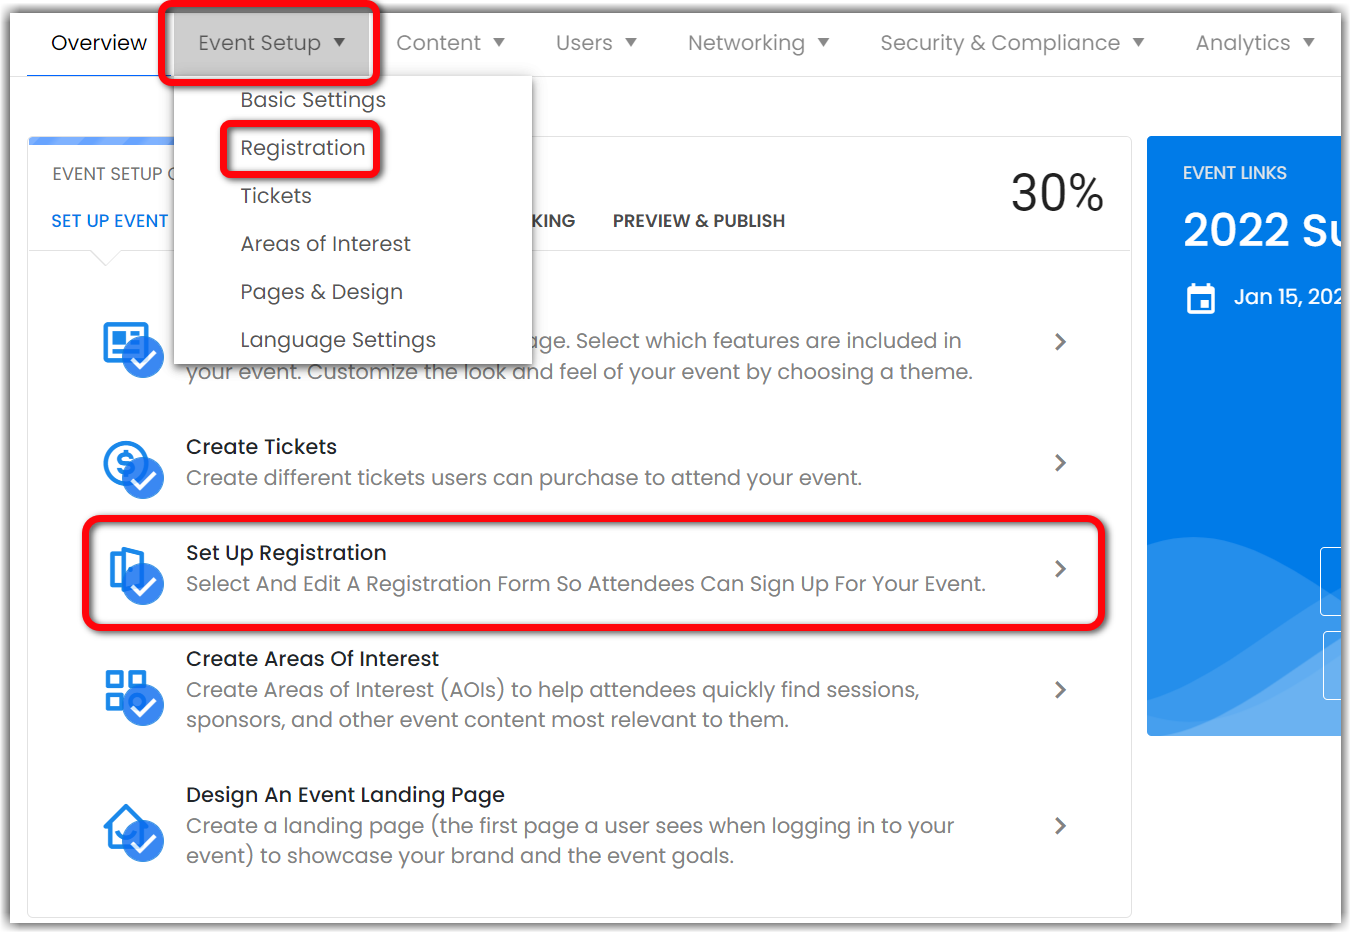
No matter which registration flow you are using, you need to set up your registration page. To do this, click Set Up Registration on the Event Setup Checklist or use the top toolbar to navigate to Event Setup > Registration.
On this page, you should update the following items:
- Form Title and Banner
- Page Layout and Form Fields
- Welcome Message (optional)
- Redirect after registration (optional)
- Enable Registration
Form Title and Banner
The form title (a) will appear above the form fields in your registration form. If you do not want this title to appear, delete the default text in this field.
Click Upload Banner (b) to insert a banner image at the top of the form.

Page Layout and Form Fields
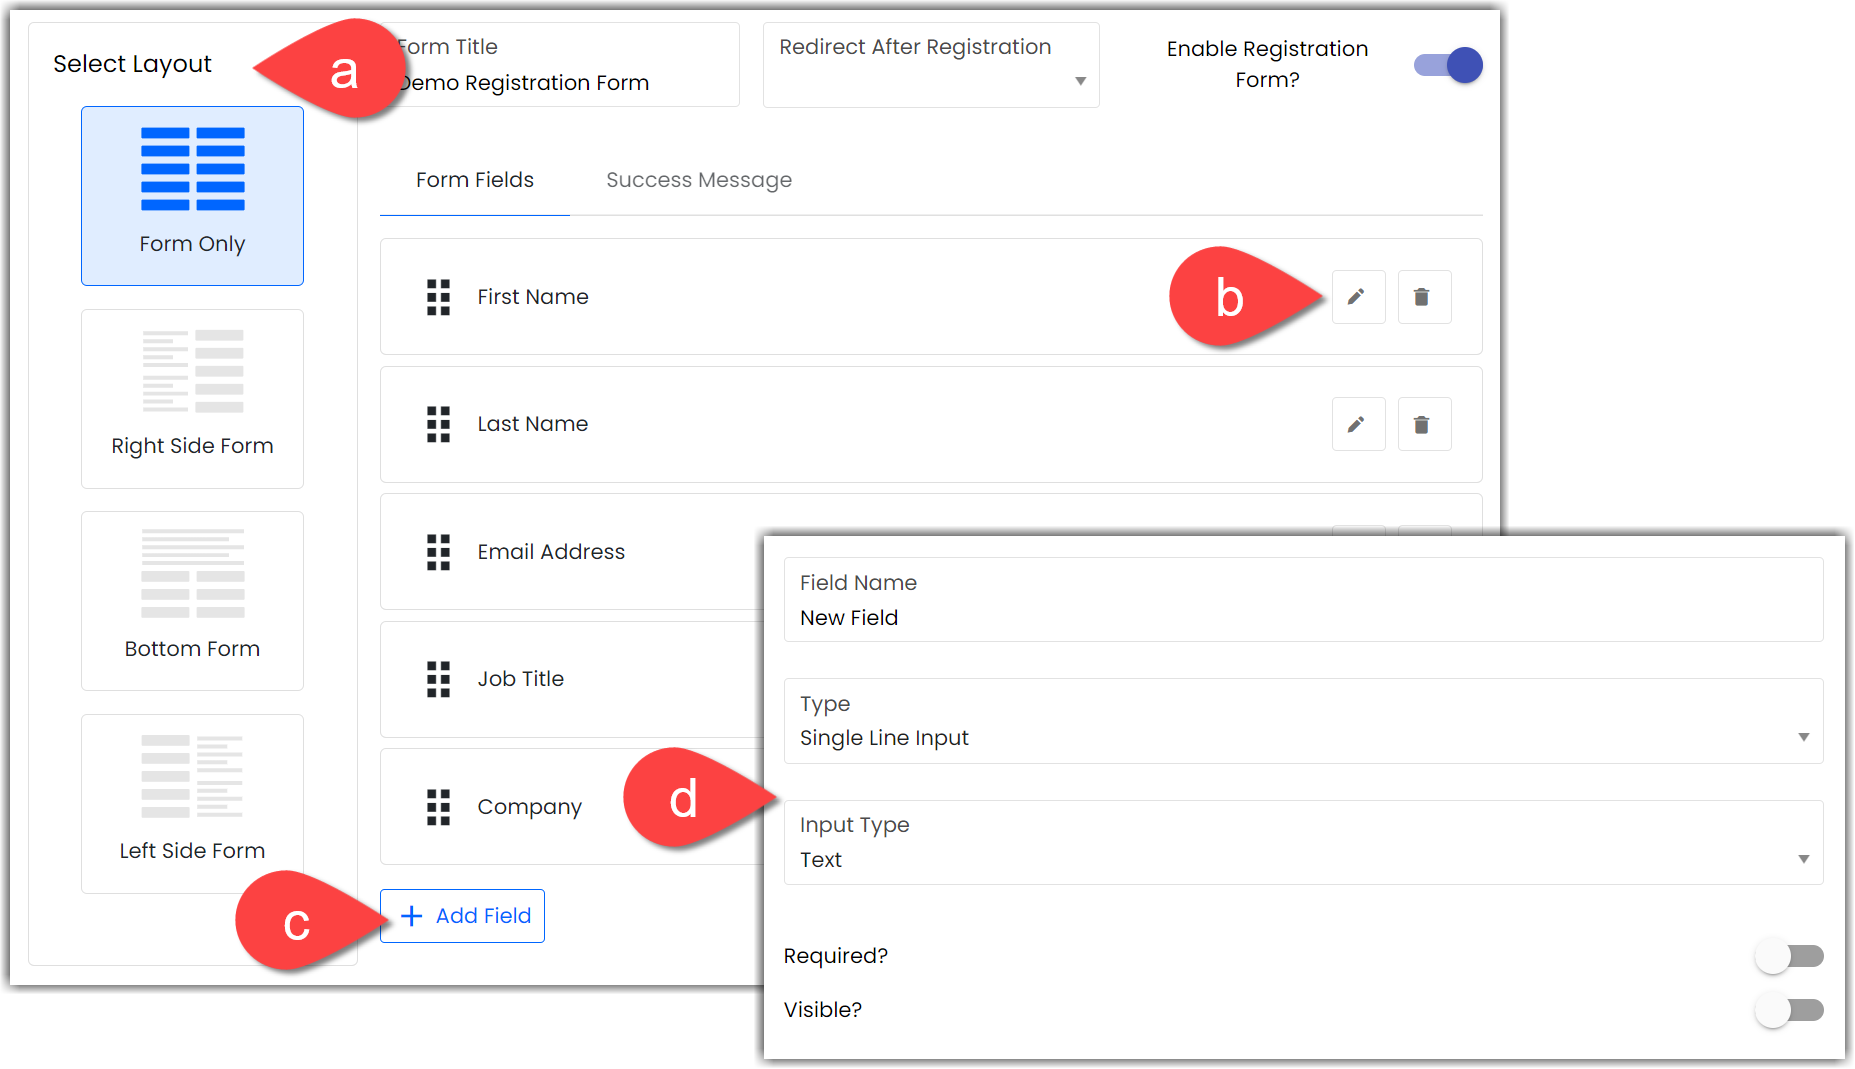
Use the options on the left side of the screen (a) to select a registration page layout: form only or additional content to the left, right, or below the form.
You can edit or remove each of the default form fields by clicking the pencil and trash can icons (b) or click Add Field (c) to add additional fields to your form. When editing or adding fields, you can update the form field name, type, whether it is required, and whether it is a form that is visible to the end user (d).
Welcome Message
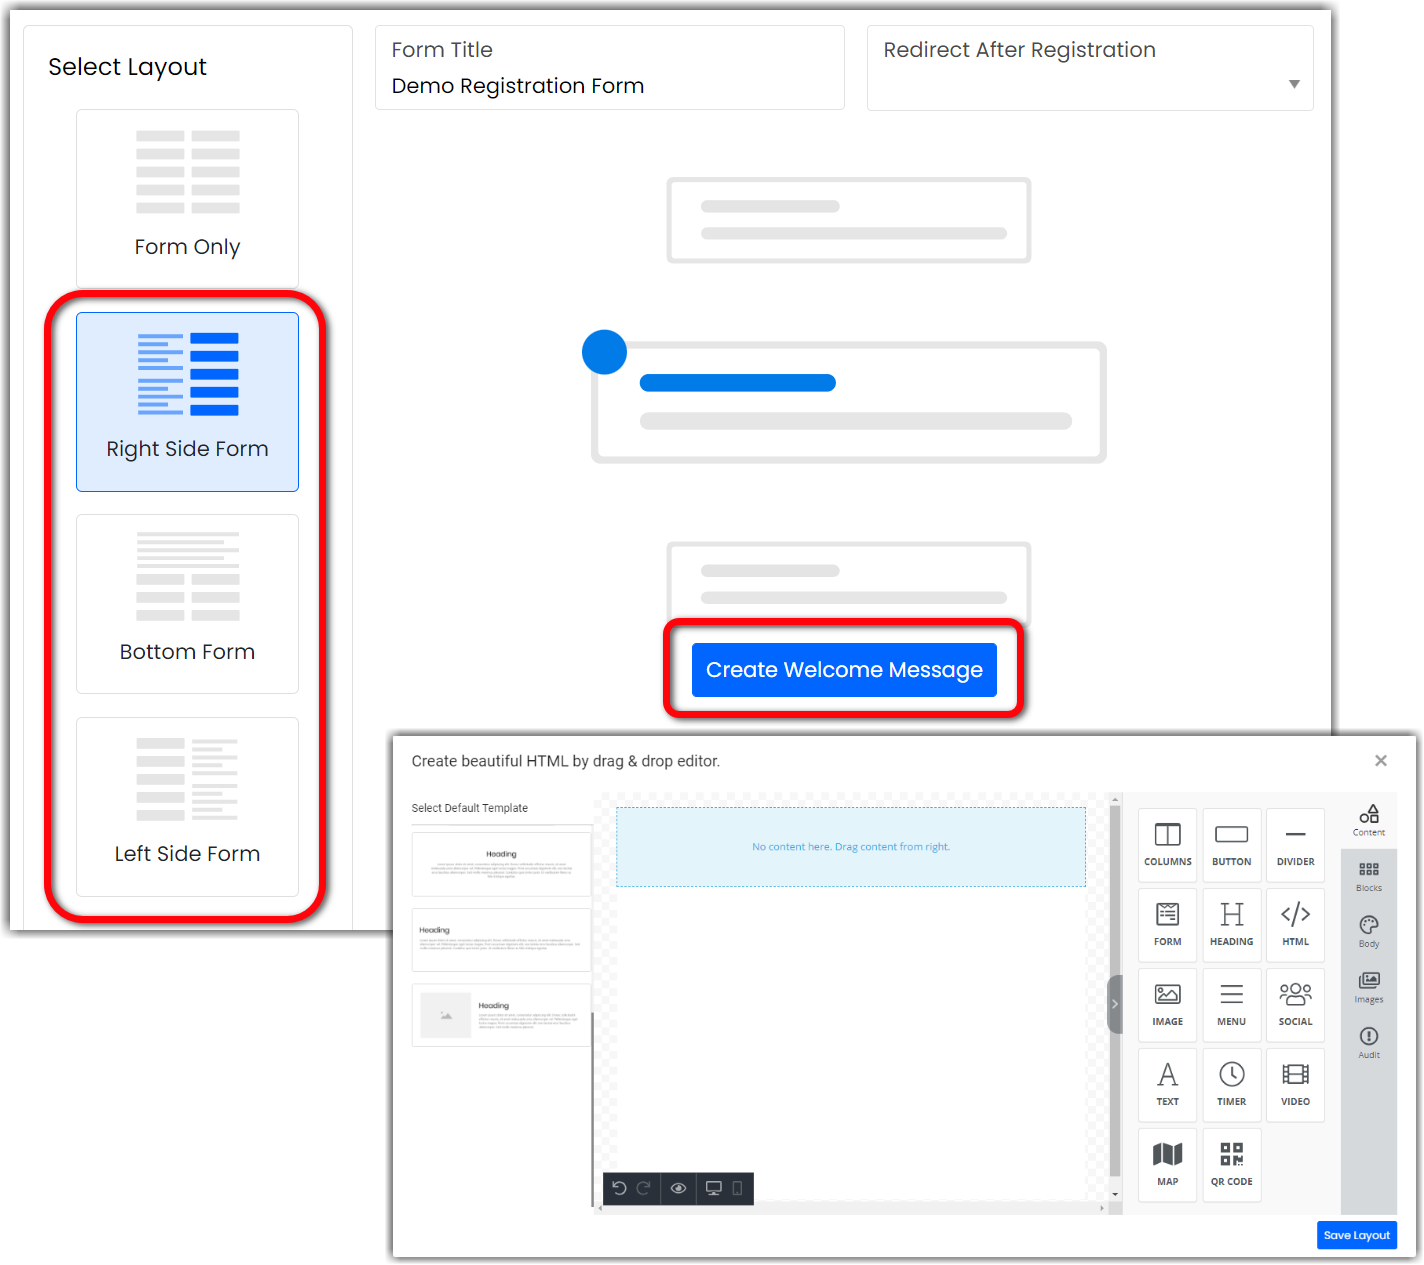
If you select one of the form + content options, click Create Welcome Message to open the Page Layout Editor.
For more information about using this tool, check out this article.
Redirect after Registration
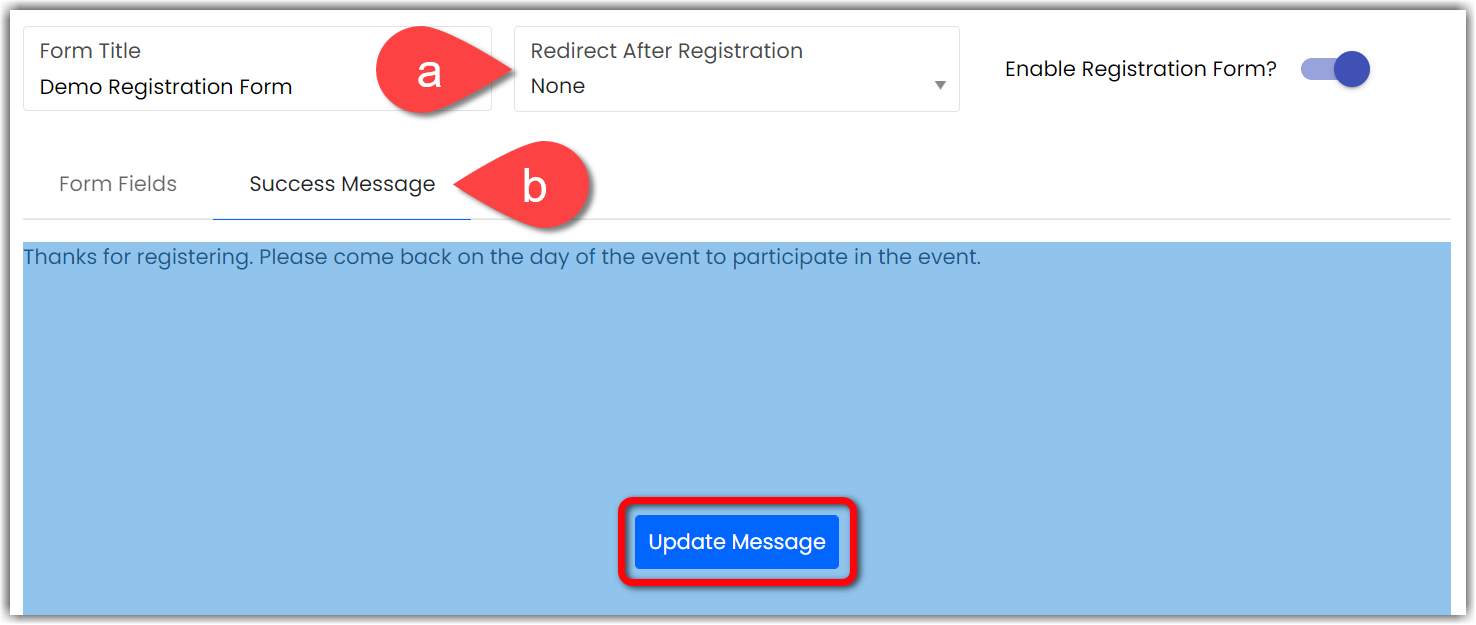
Use the Redirect dropdown (a) to set which event page you would like users to be redirected to after they have completed registration. If you select None, users will remain on the registration page. In this case, make sure to update the Success Message (b). This content will appear in place of the registration form after users have successfully registered.
Enable Registration
By default, registration is enabled, meaning that your registration form will be accessible to anyone who navigates to your event’s landing page.
If you aren’t yet ready to open your event registration, turn this toggle off. When registration is disabled, you'll note that the registration form fields disappear from the screen and you can instead create a message to be displayed to users in the place of the registration form. The message on the Thank You tab (a) appears to users who have already registered for the event, and the message on the Close Message tab (b) appears to users who have not registered for the event.

4. Edit the Event Landing Page
Ticket + Registration Flow
Once you have created tickets and updated your registration page, check out your event’s landing page to make sure the ticket section appears as expected. To do this, navigate to the landing page editor either by clicking Design an Event Landing Page on the Event Setup Checklist or use the top toolbar to navigate to Event Setup > Pages & Design > Before Login.
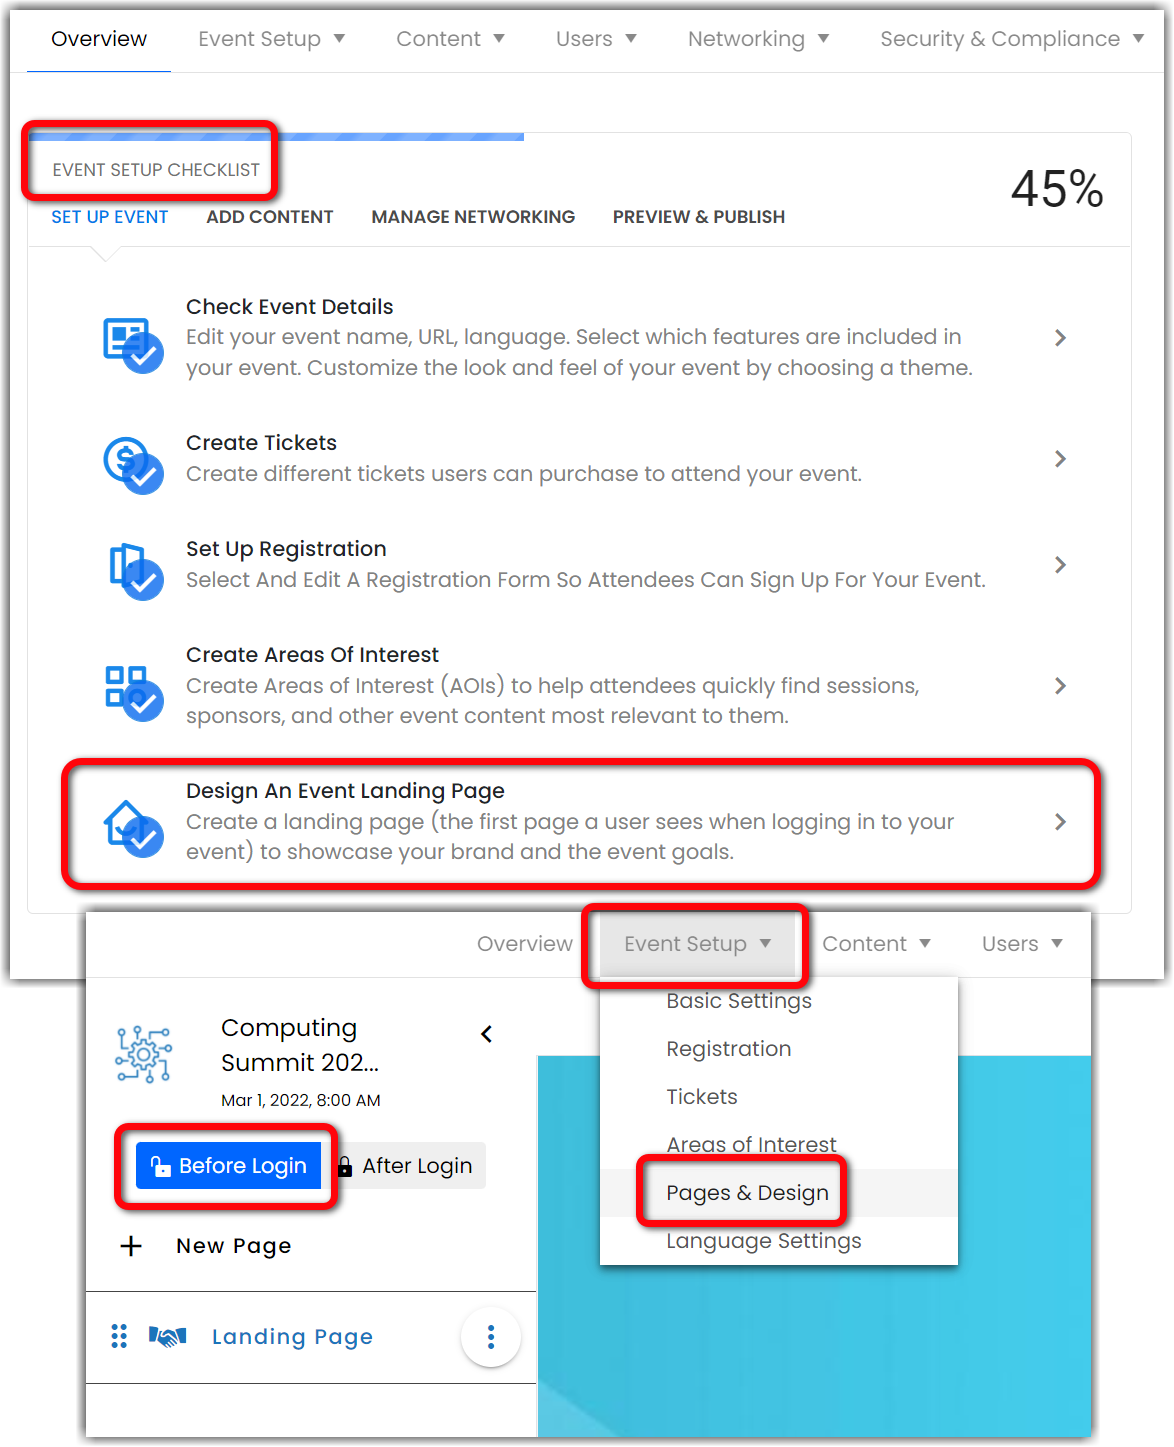
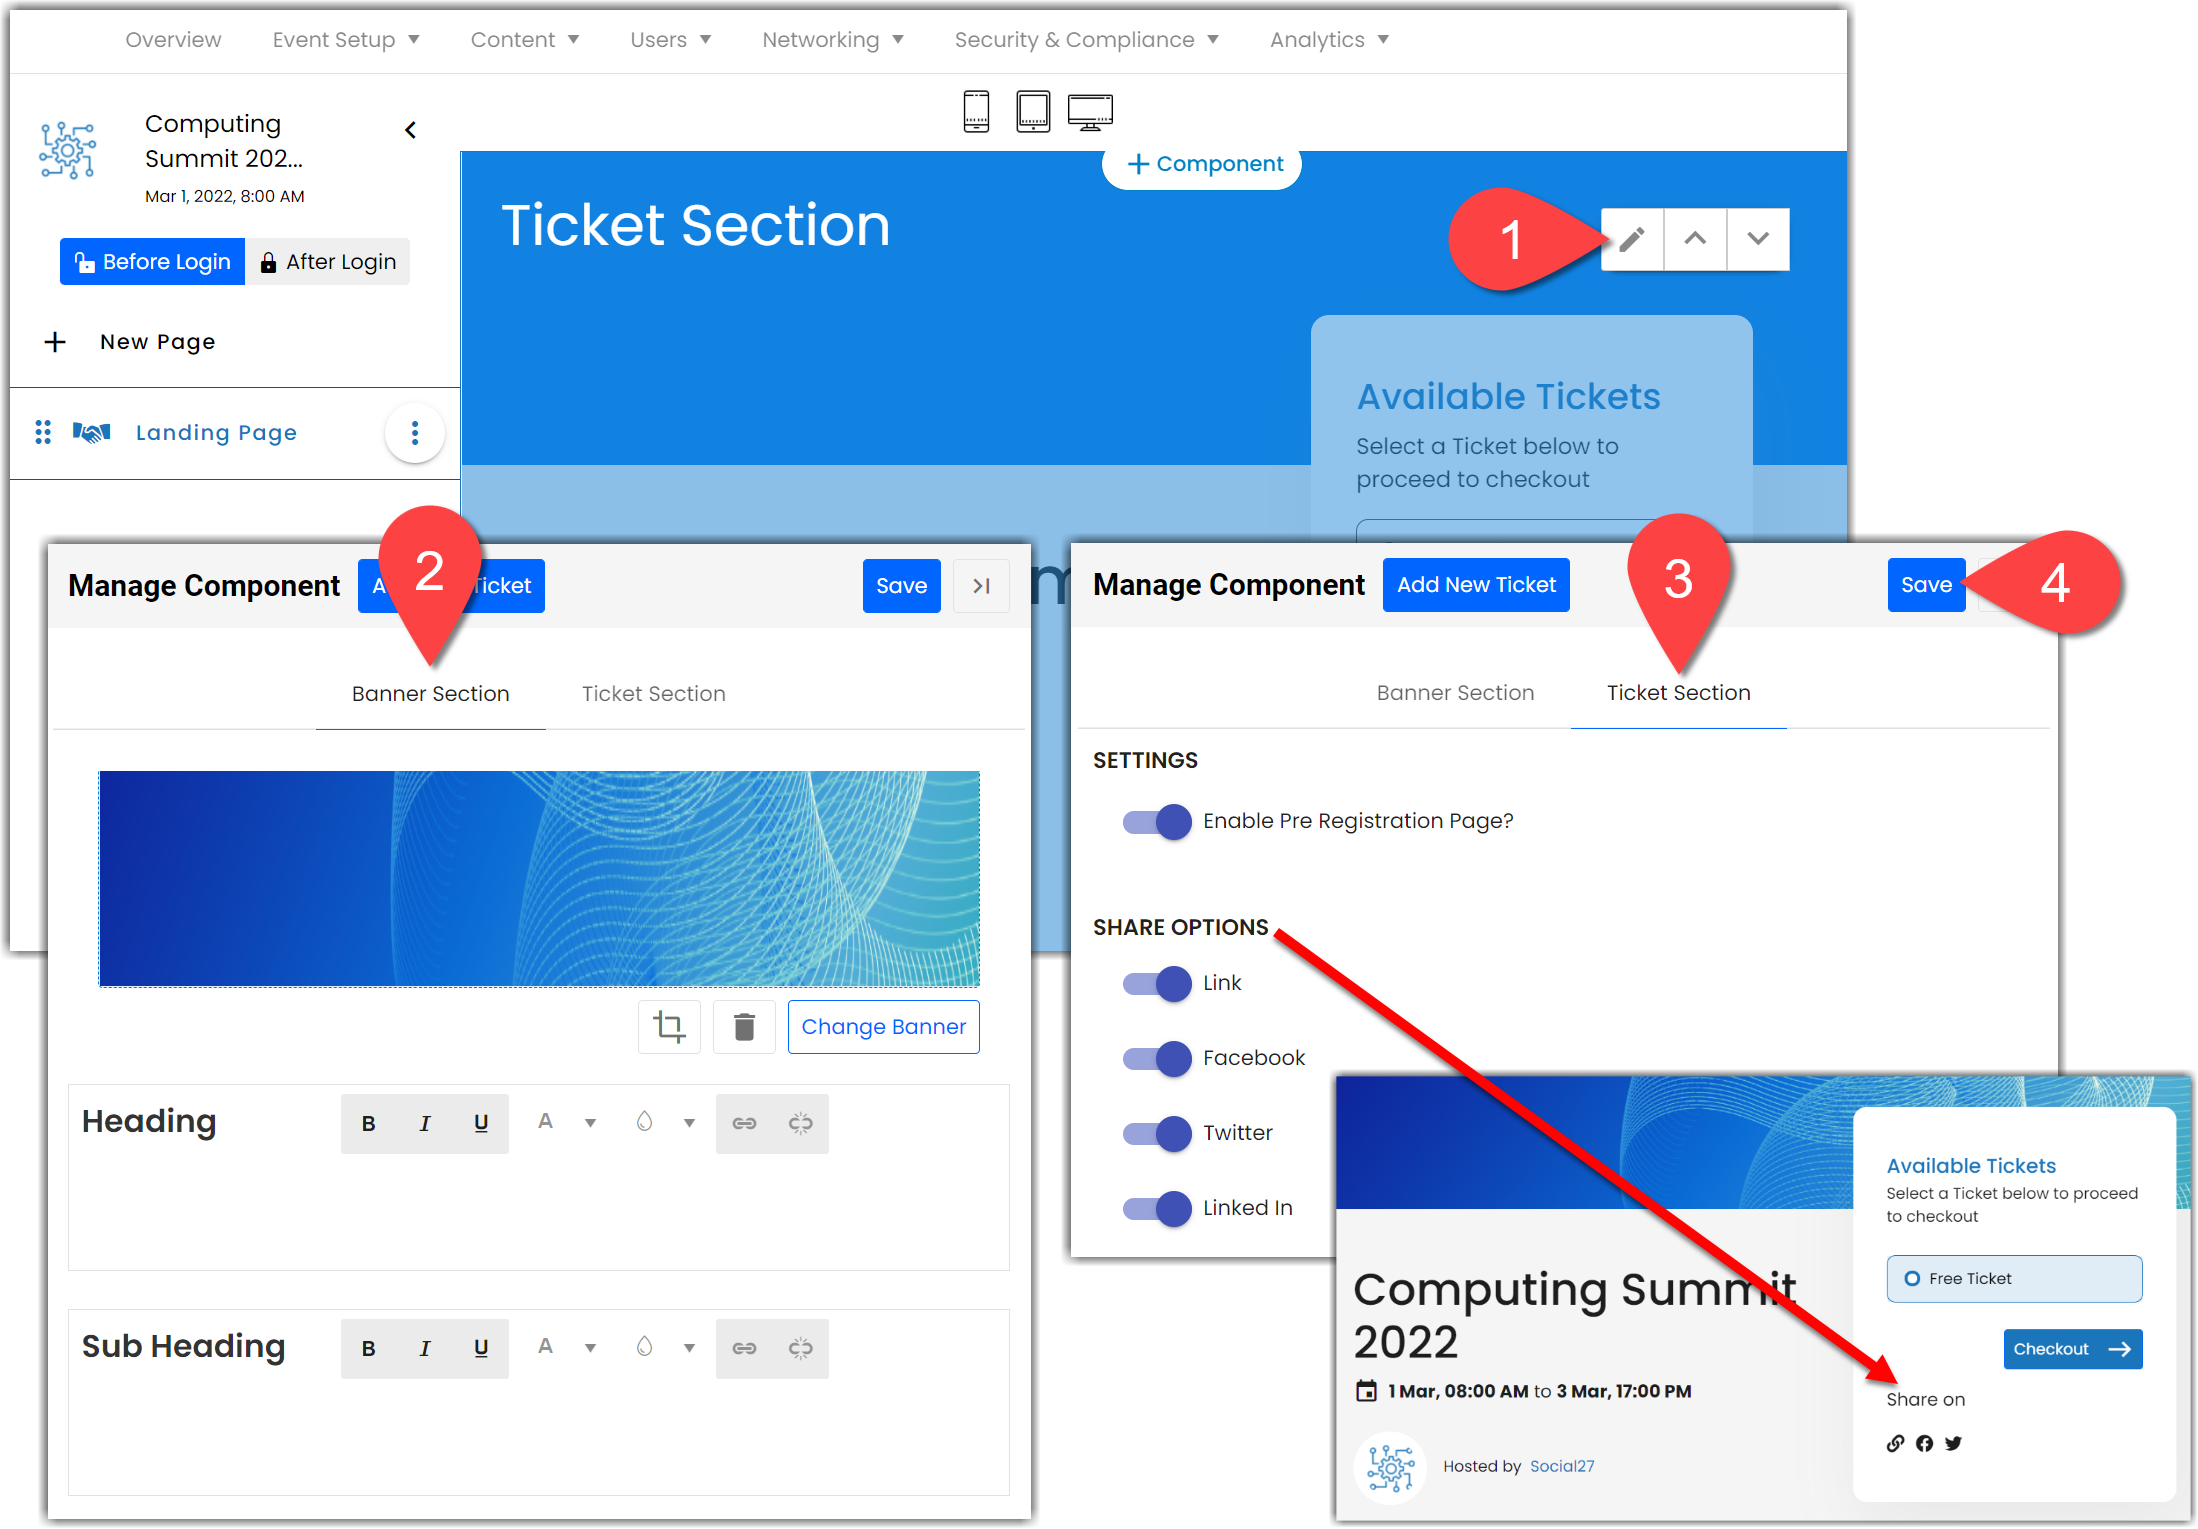
Once on this page, hover over the Ticket component to reveal and click the pencil icon. Use the Banner Section tab to update the component’s banner, heading, and subheading. Use the Ticket Section tab to enable or disable the event’s pre-registration page and adjust the share options that appear below the registration form. Once you’ve made all necessary changes, click Save.
|
|
Registration Only Flow
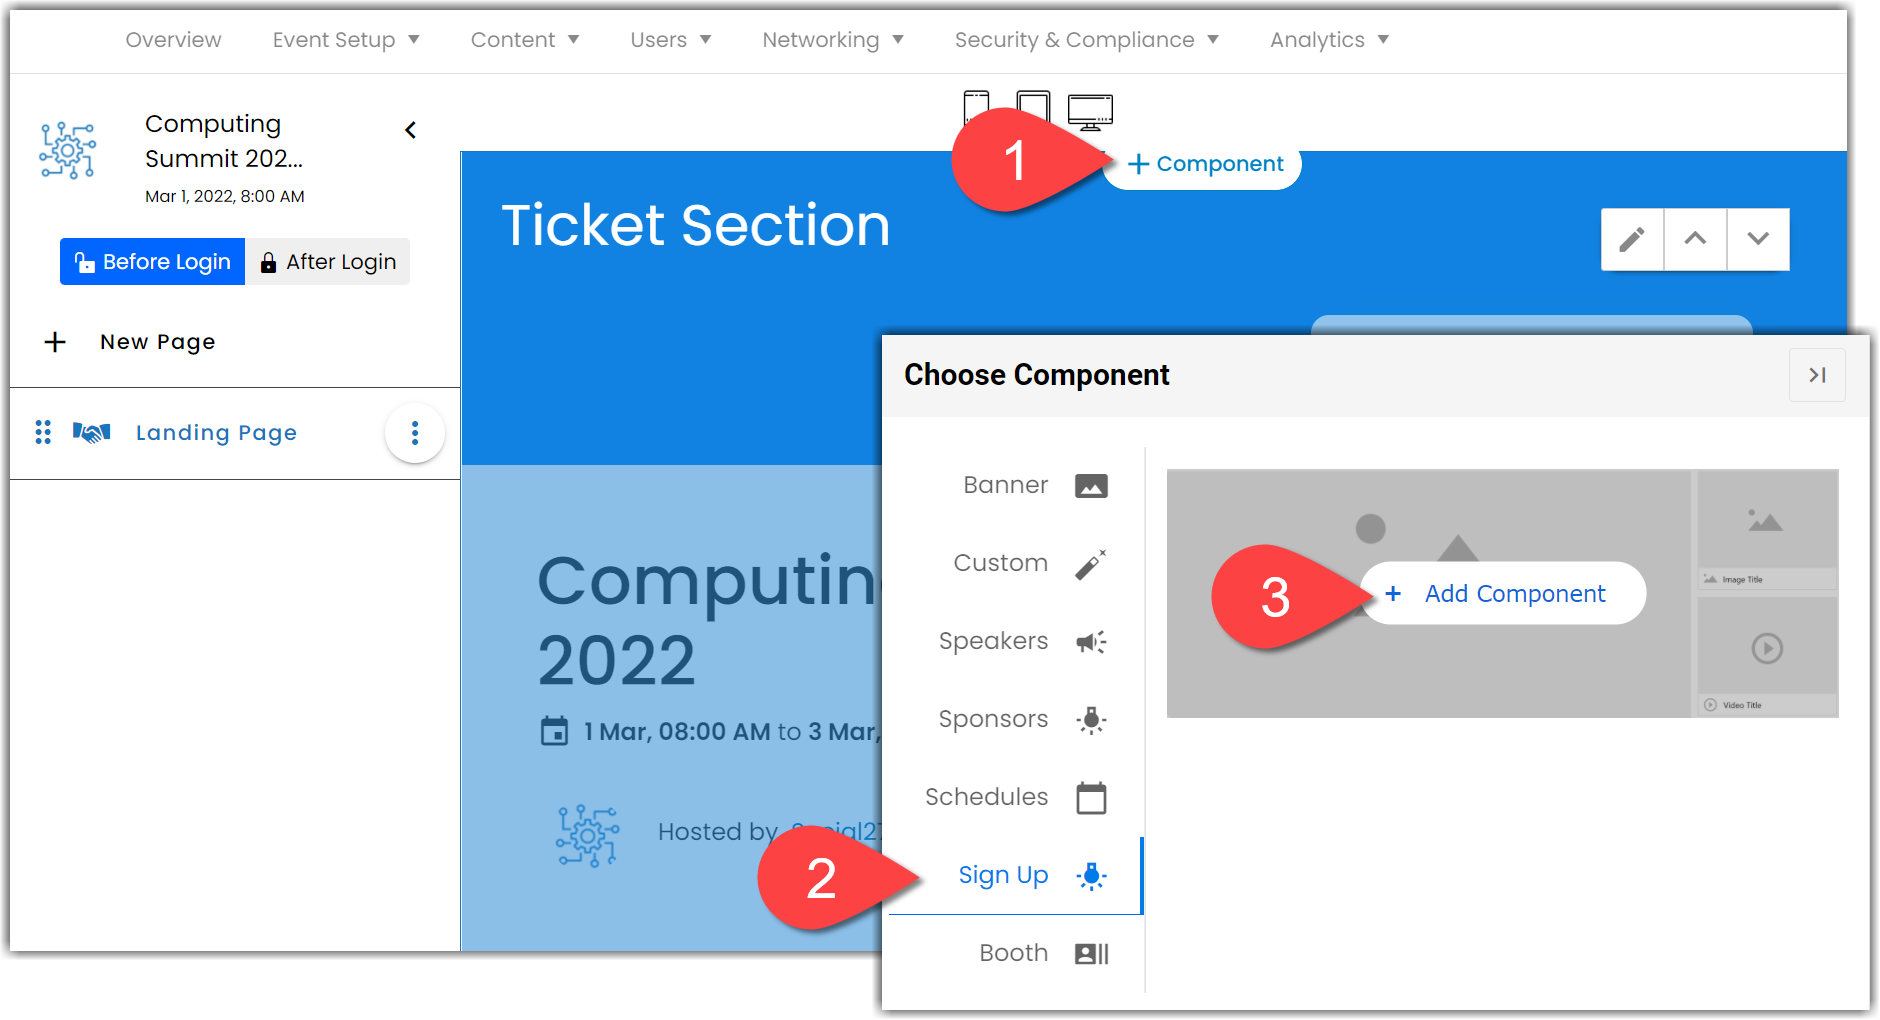
If you do not want to require users to purchase event tickets, instead of editing the Ticket component on the event’s landing page, you should instead add a registration component. To do this, hover over any component on the event landing page, click Add Component, then select the Sign Up component. Once you add this component, the default ticket component that usually appears on the event landing page will be removed and replaced with your registration page, allowing users who navigate to the event immediate registration access.
For additional information about editing your event pages and components from Pages & Design, check out this article.
5. Update Registration Email Notifications
No matter which registration flow you are using, you should update the email that is sent to people after they’ve successfully registered for your event.
To edit this email, navigate to Content > Email Notifications. Click Default Email Template and open the Welcome To {{Event.Name}} – {{User.FullName}} template to edit it. When you are finished, click Update Email Template.
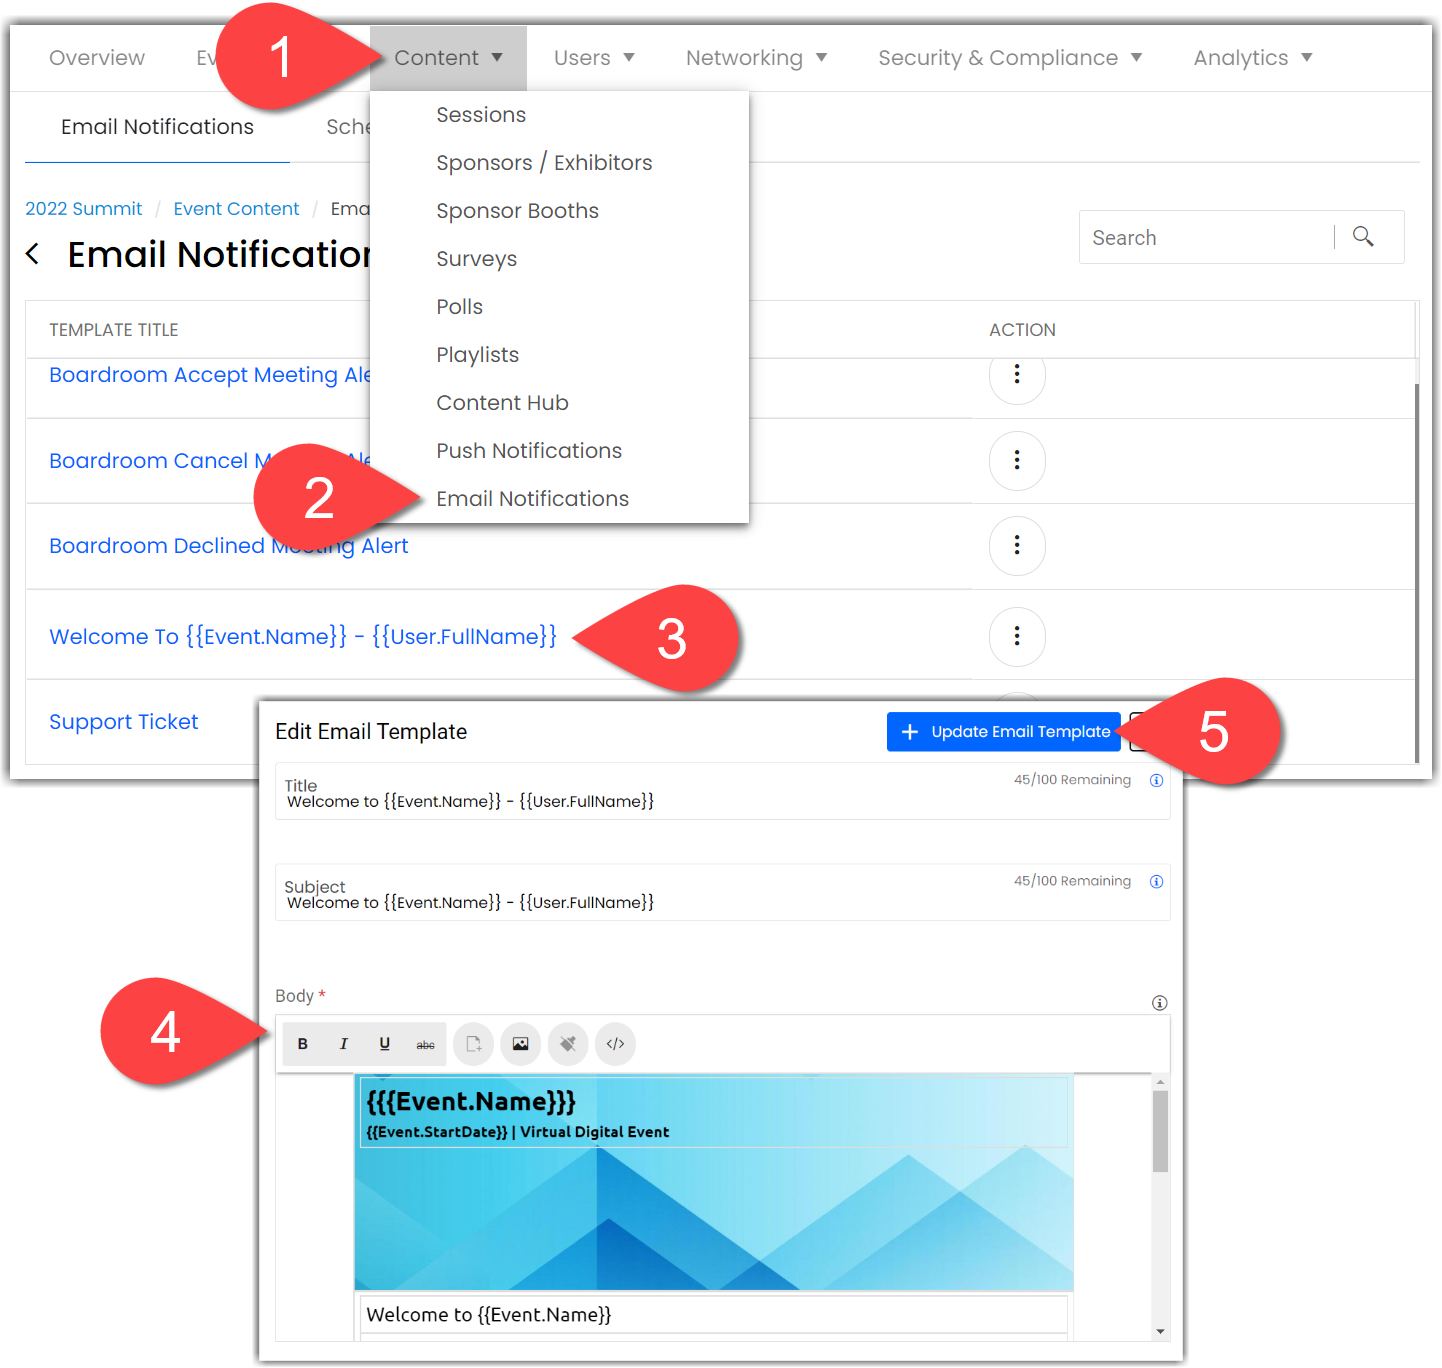
Example: {{Event.Name}} If you would like these terms to update dynamically, do not edit these portions of the email template. |
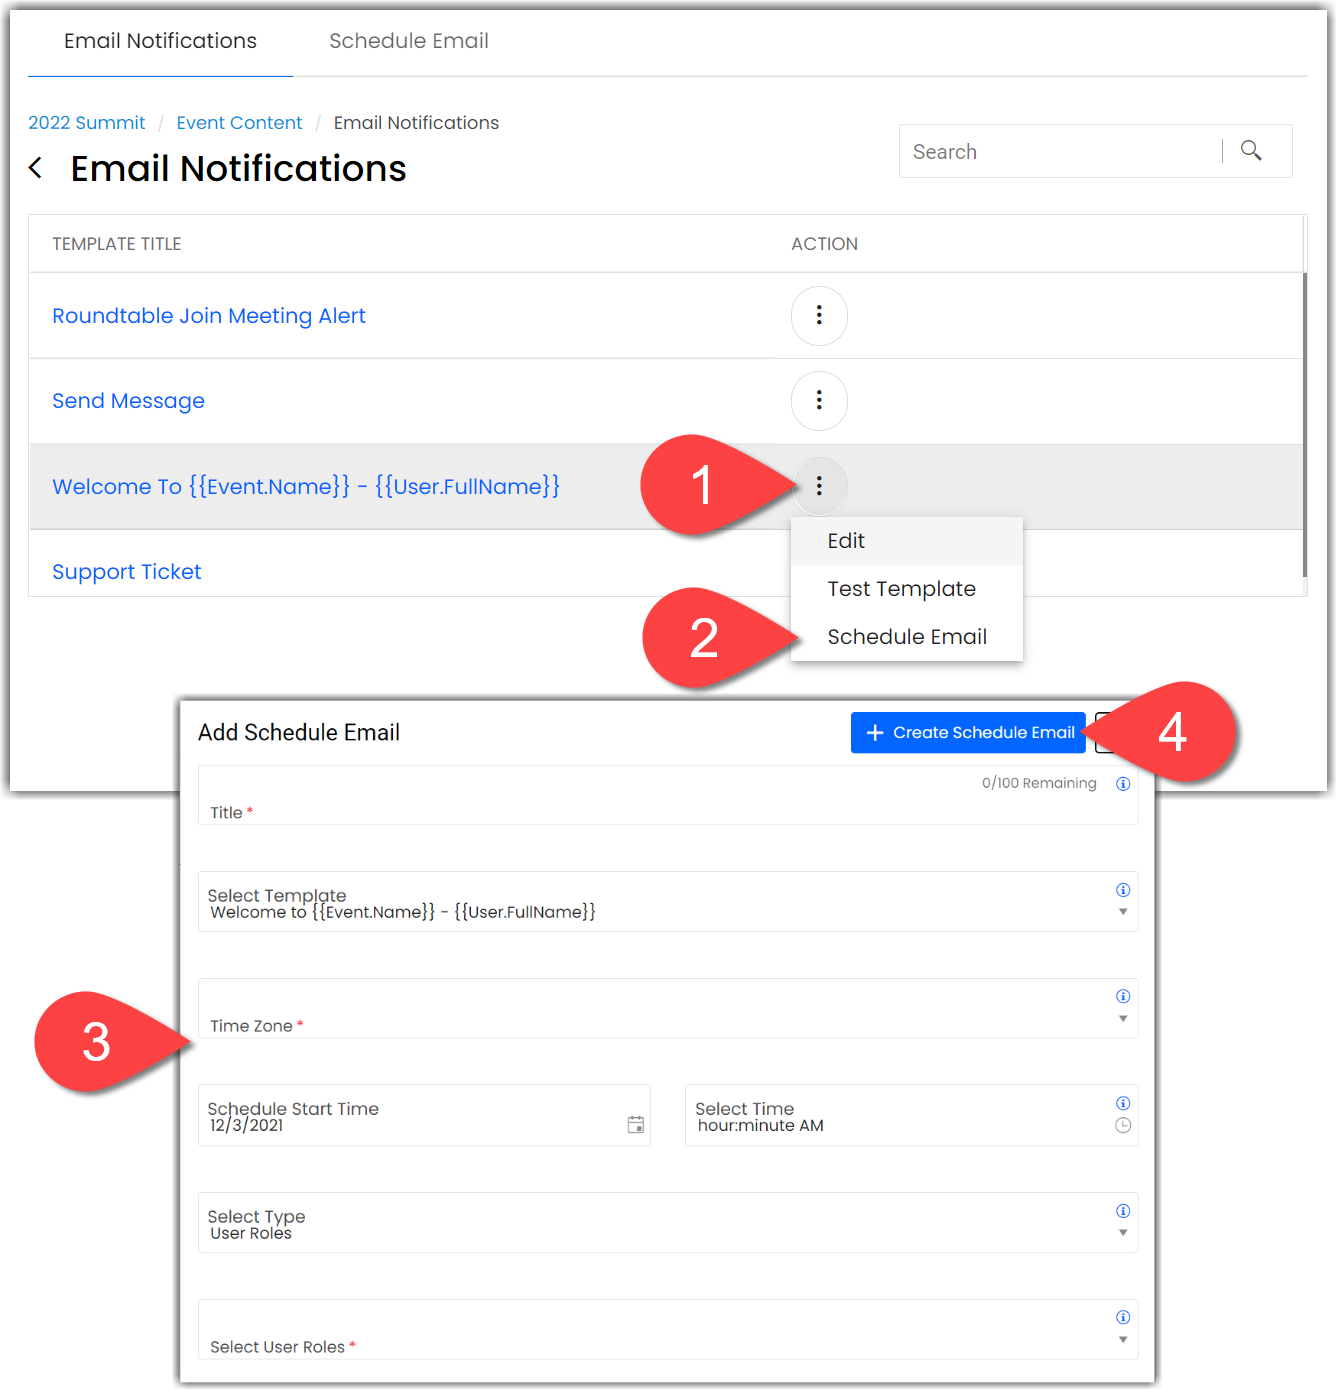
Once you’ve adjusted the email contents, you can update when the email is sent. Click the ellipses icon in the Welcome template row and select Schedule Email. Adjust the information as needed in the Add Schedule Email form and click
For more information about creating email templates and scheduling emails, check out the following articles:
6. Consider Registration Tips and Recommendations
Restricting Total Registrations
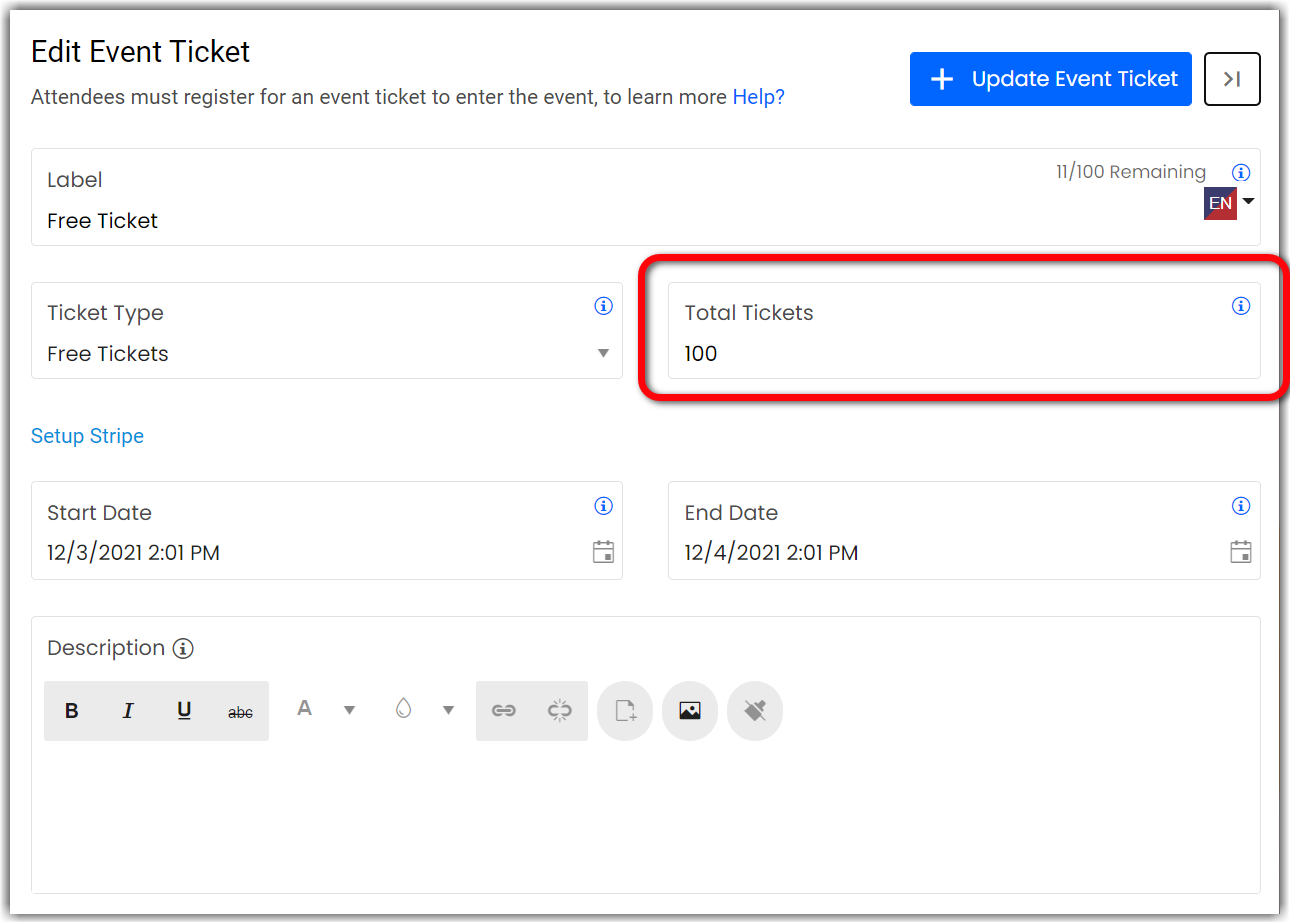
You may want to restrict the total number of people who can register for your event. It’s especially recommended to restrict the number of registrations for public events. To do this, update the Total Tickets field when you create your event tickets.
Managing Ticket Costs by Date
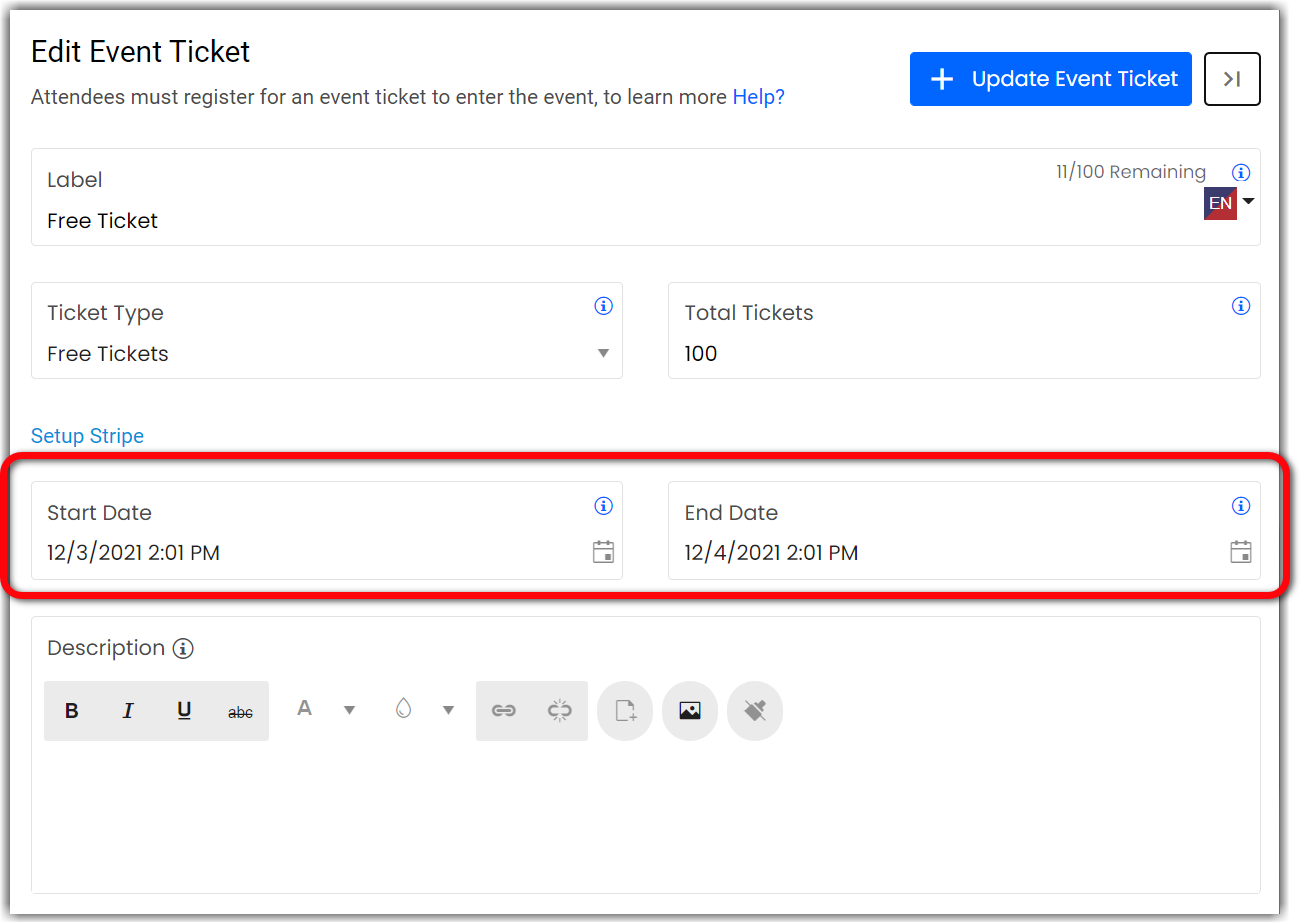
If you want users to purchase tickets to register for your event, you can use ticket dates to increase ticket costs for users who register later than others.
For example, you can create Early Bird tickets that cost $50 and can be purchased two months before the event. One month before the event, you can make Regular tickets available that cost $100, and in the week before the event, you can shift to Last Minute tickets that cost $150.
Controlling Registration Open and Closed Dates
You can control when users are able to register for your event by using either the dates on tickets or by enabling/disabling your registration form. For example, you may want to open registration a month before your event takes place but close it five days before the actual date of the event. If you have tickets, you can simply set the ticket dates to only be available up until five days before the event start date. Alternatively, you can use the Enable Registration toggle to manually close event registration.

Previewing your Registration Form
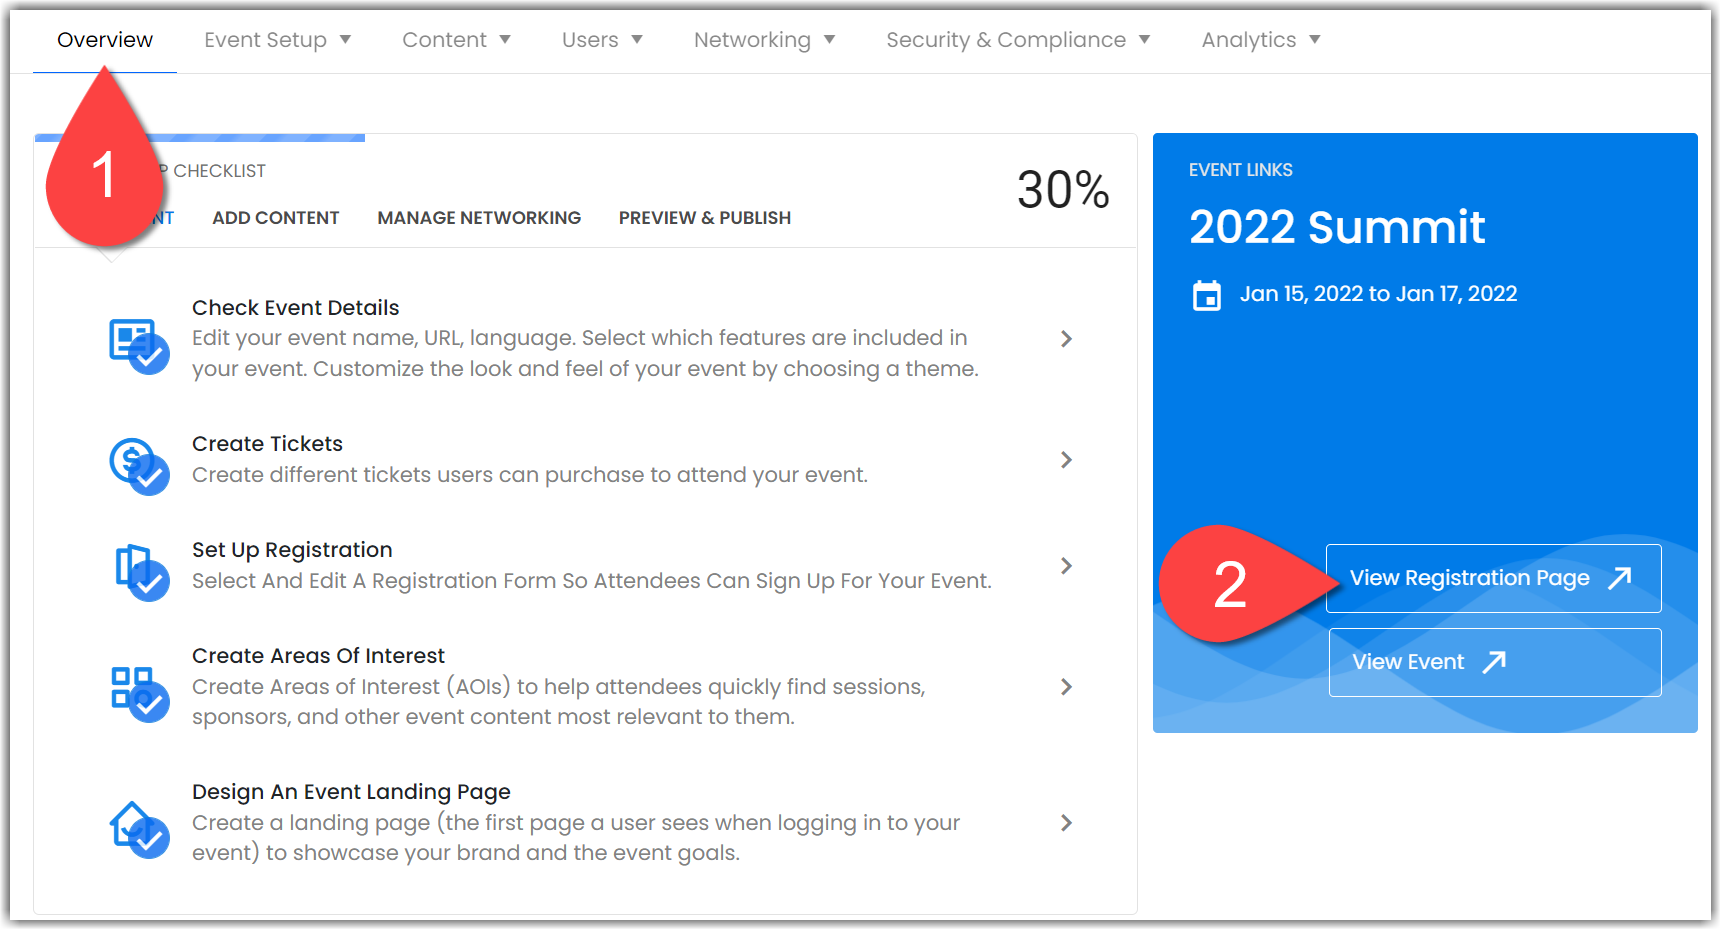
At any point, you can quickly preview what your registration page looks like by navigating to the Overview page and clicking the View Registration page.
![]() Further Reading :
Further Reading :


Comments
0 comments
Please sign in to leave a comment.