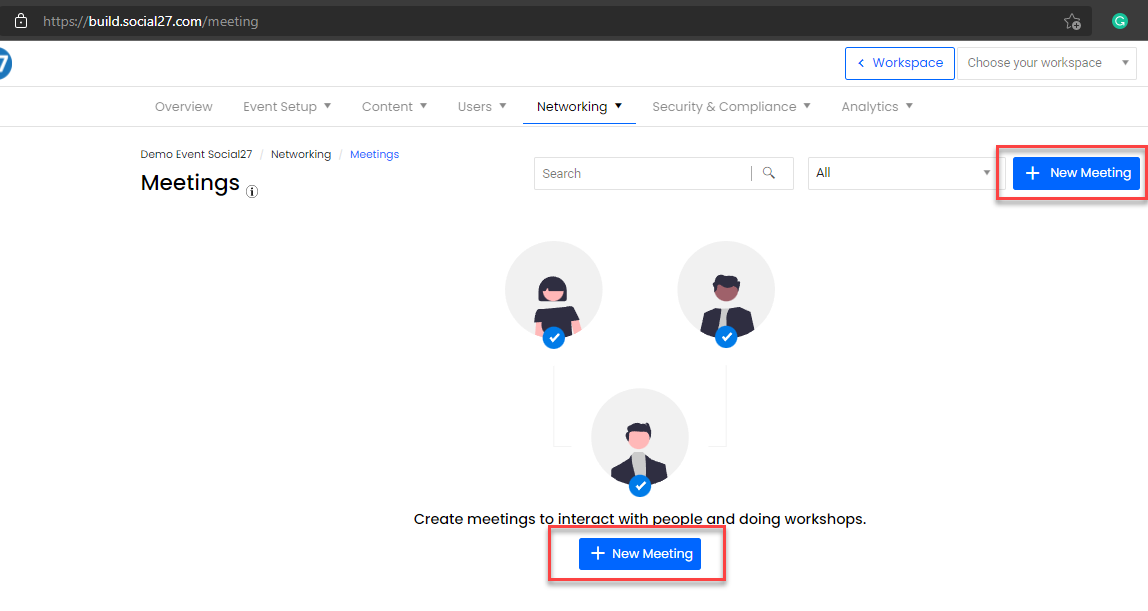
The features discussed in this article are only applicable to Event Owners who are leading events within the platform. To begin managing meetings for your event, hover to the Networking tab on your Manage Event view and click on Meetings.

The following features below can be found on the next screen after clicking on Meetings.

The Search Box, allows you to look up meetings that you wish to try and find from the public available meetings and the ones that you have been invited to.
The filter box allows you to change the order of Meetings that are displayed from the middle of the screen.
 To create new meetings you have the option to click any of the buttons below. Note: you will not see the one in the middle of the screen if the space is filled out with meetings to be displayed.

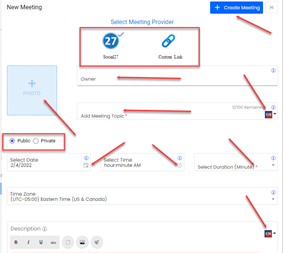
The Illustration below shows all the details of a meeting that needs to be filled out and their features.

- Create Meeting button – allows you to save the meeting and complete the setup
- Meeting Provider – allows you to choose the application that you wish to use to run the meetings options are Social27 and Custom (Microsoft Teams, Zoom, etc.)
- Owner – This is a feature that an event owner can use to assign an owner for a specific meeting without the need to be authorized. This person has to be registered for the event to allow a person to become an owner of a certain meeting.
- Meeting Topic – is a required field that will serve as a Title for the Meeting itself and will surely tell whether people will join your meeting or not. Right towards the end of the box is the multi-lingual option that allows your meeting details to be displayed in the language of choice. Currently, there are 4 options within this feature e.g. English, Italian, Spanish, French. Note that only the fields that this Icon appears in are the ones that can be translated within the even if properly defined.
- Photo/Logo – this box is where you can upload a logo for the event or an eye-catching thumbnail.
- Public/Private Toggle – this radio button switches your meeting to the public or per invite-only or private.
- Date/Time/Duration – these are required fields that need to be filled out for the meeting to be published, note that you cannot use a time in the past nor a time that is before the beginning of the event date.
- Timezone – this allows the event owner to set the timezone for the meeting and is a good reference for meetings that can happen in different parts of the world. Attendees can set their timezone so that any differences in what is available in the meetings can be noted.

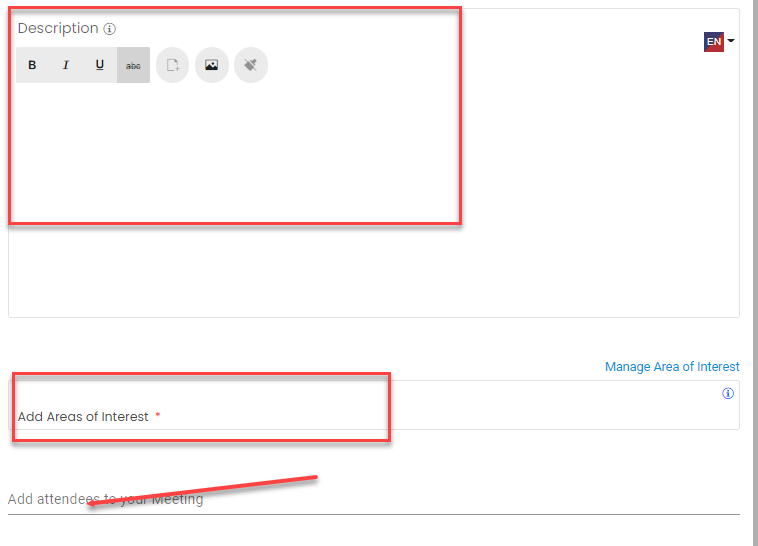
9. Description Box – this allows the event owner to add some details about the meeting to help attendees have a better understanding of what can be expected at the meeting. This is a good place to be creative and on point with the goals of the meeting being created.
10. Areas of Interest – this is an integral part of setting up your meetings as this matches your meetings to people who picked the same Area of Interest. The Social27 Recommendation Engine runs using this piece of data and allows for a better and tailor-fit experience in the event.
11. Add Attendee – allows an event owner to manually add an attendee to a meeting. Usually recommended for C-level executives that need to attend meetings.
![]() Further Reading :
Further Reading :
- How do I Manage Happy Hours?
- How do I Manage My Event Schedules?
- How do I Manage Hello World Videos?
Comments
0 comments
Please sign in to leave a comment.