Single sign-on (SSO) is Social27’s method for securing efficient access control. The purpose of SSO is to help you centralize and simplify your user experience. By acting as a central identity authenticator, SSO enables you to send your users directly to Social27 without forcing them to visit the login page.
Here you will learn the basic steps to setting up SSO within your account, the SSO standards Social27 supports, the configurations needed to add your SSO login details to an account, and the process of implementing SSO.
Walkthrough Video:
Note: This process relies on client systems to authenticate the user’s credentials within their own system before the user is directed to Cvent’s application.
Follow the steps below after you are logged in:
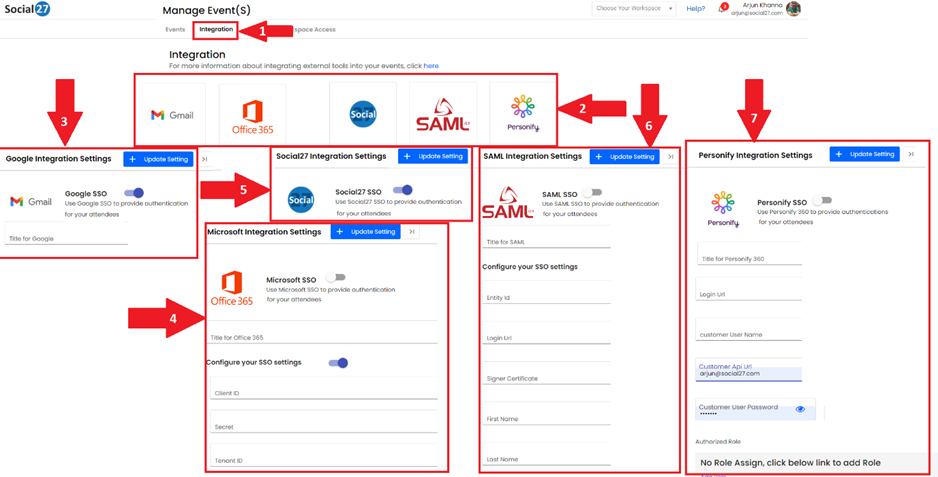
- Click the Integration tab from the top of the Manage workspace page.
- Here you will see all the available Single Sign-on (SSO) available.
- Gmail – Can be turned on, just by enabling the toggle button and you can also enter the title of the field.
- Office365 – After enabling the toggle button, enter the system configuration (Client ID, Secret, and Tenant ID).
- Social27 – Enable Social27 if you would like attendees to log in with the email that they have used at the time of registration. Use this SSO, when you have uploaded the attendee list to Social27, or you have used the Social27 Registration.
- SAML – After enabling the toggle button, you will need to enter the configuration settings. (Entity ID, Login URL, Signer Certificate, First Name, Last Name, Email, Job Title, Department, Location, Employee Type, and Manage)
- Personify – After enabling the Toggle. you will need to enter the configuration settings. (Title for Personify 360, Login URL, User Name, API, URL, Password, Authorized Role, No Role Assign, click below link to add Role, Vendor Name, Vendor ID, Vendor Password, Vendor Block, SSO Service URL, Role Service URL)

Comments
0 comments
Please sign in to leave a comment.