Introduction:
SAML (Security Assertion Markup Language) is an XML-based standard used for exchanging authentication and authorization data between parties. SAML enables Single Sign-On (SSO) for web applications, allowing users to authenticate once and access multiple applications without having to enter their credentials multiple times. In this document, we will go through the steps to set up SAML 2.0 for SSO.
Prerequisites:
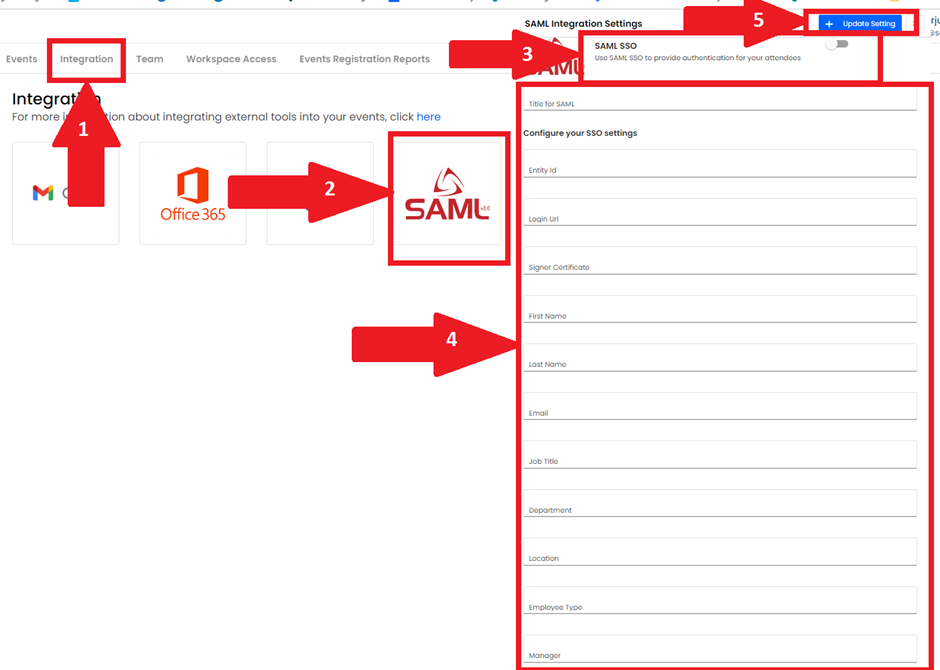
Before starting the SAML setup, you need the following: Entity ID, Login URL, Signer Certificate, First Name, Last Name, Email, Job Title, Department, Location, Employee Type, and Manage
Enable SSO
Follow the steps below after you are logged in:
- Click the Integration tab from the top of the Manage workspace page.
- Here you will see all the available Single Sign-on (SSO) available.
- Click SAML

Configure the SAML settings:
Login URL: Use login URL
Signer Certificate: is required to authenticate and save your settings. This can be downloaded from the "Single sign-on" inside Microsoft Azure. The X.509 certificate file must be in PEM format.
First Name:
Last Name:
Email:
Job Title:
Department:
Location:
Employee Type:
Manage:
Staging:
"EventUri" : https://devapp.social27.com/
Pre-prod:
"EventUri" : "https://pre-app.social27.com/
Identifier (Entity ID) https://pre-idauth.social27.com/External/Saml
Reply URL (Assertion Consumer Service URL) https://pre-idauth.social27.com/External/SamlAcs
Prod:
Identifier (Entity ID) https://pro-identity-auth.social27.com/External/Saml
Reply URL (Assertion Consumer ServiceURL) https://pro-identity-auth.social27.com/External/SamlAcs
Identifier URL
In Basic SAML Configuration in azure Identifier (Entity ID) should match with our identity server Audience / Issuer
Example:
"Audience": "https://pro-identity-auth.social27.com/External/Saml"
Identifier (Entity ID): https://pro-identity-auth.social27.com/External/Saml
Entity ID: This is the unique identifier of the application that is being registered. It should match the Entity ID provided by the SAML identity provider. (Including the trailing /)
e.g.
"EntityId" : "https://sts.windows.net/e20b0aa3-6ec3-4272-a76a-aaa32e0f10d6/ )
Identity Provider
Azure Active Directory
In a separate window, sign into Azure AD. To create a Social27 application, follow these steps:
- Navigate to Azure Active Directory > Enterprise applications and follow these steps:
- Click New application.
-
Click Create your own application.
This opens the Create your own application pane. -
Enter a name for your new app.
Ensure Integrate any other application you don’t find in the gallery is selected. -
Click Create.
When the application's Overview page displays, the application is created. - Click Users and groups.
-
Click +Add user/group. Highlight your choice in the search bar, click Select, and click Assign.
Repeat as necessary to add users/groups. - Click Single sign-on.
-
Select the SAML tile.
This opens the Set up Single Sign-On with SAML page.- In section 1, provide the two values listed below.
-
Identifier (Entity ID):
PRE-PROD: https://pre-idauth.social27.com/External/Saml
PROD: https://pre-idauth.social27.com/External/SamlAcs
-
Reply URL (Assertion Consumer Service URL):
PRE-PROD: https://pro-identity-auth.social27.com/External/Saml
PROD: https://pro-identity-auth.social27.com/External/Saml
HYPERLINK "https://yourlacework.lacework.net/sso/saml/login"
10. In section 2, ensure that you have the correct Unique User Identifier specified under Attributes and Claims. The default user identifer is preconfigured as user.userprincipalname. However, depending on your organization, you can also use the email address as the Unique User Identifer by specifying user.mail.
11. In section 3, download and save the Federation Metadata XML file.
Comments
0 comments
Please sign in to leave a comment.